by C. Wilson and M.Bauer*(7/14)
Quick Facts…
- People interested in waterwise gardening should consider drip irrigation.
- Odd-shaped and narrow areas are easily irrigated with drip systems.
- Drip irrigation stretches water supplies and may be exempt from water restrictions imposed during drought.
- Drip irrigation equipment is readily available and can easily be installed by do-ityourselfers.
- Common setup mistakes include not installing a filter or pressure reducer, use of overly long lengths of mainline, and adding too many drip emitters.
- Drip systems can be easily changed over time as plants grow and needs change. Use goof plugs to plug holes in mainline that are no longer needed.
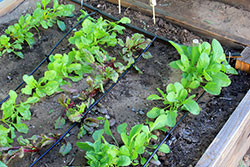
Drip, or micro-irrigation, technology uses a network of plastic pipes to carry a low flow of water under low pressure to plants. Water is applied much more slowly than with sprinkler irrigation.
Drip irrigation exceeds 90 percent efficiency whereas sprinkler systems are 50 to 70 percent efficient. It is so efficient that many water utilities exempt landscapes irrigated with drip from restrictions during drought. Note that any irrigation system is only as efficient as the watering schedule used. If systems are set to water excessively, any system including drip can waste water.
Low volume application of water to plant roots maintains a desirable balance of air and water in the soil. Plants grow better with this favorable air-water balance and even soil moisture. Water is applied frequently at low flow rates with the goal of applying only the water plants need. Sprinkler irrigation results in a greater wet-to-dry fluctuation in the soil and may not produce optimal growth results.
Micro-irrigation systems are more widely available and better designed for use in home gardens than ever before. Traditionally used for growing commercial vegetables, orchards, windbreaks, greenhouse and nursery plants, micro-irrigation systems are well-adapted for home use. Use them in landscapes, vegetable and flower gardens and for small fruits. They are well-suited to irrigate container plants as well. When combined with a controller, drip irrigation systems can be managed with ease.
Micro-irrigation is ideal for berm plantings. Slopes are inefficient to irrigate because gravity pulls water downhill, causing runoff and water waste. The slow rate of water applied through drip irrigation is more likely to soak in before it runs off.
Advantages
Drip irrigation delivers water slowly immediately above, on or below the surface of the soil. This minimizes water loss due to runoff, wind and evaporation. Drip irrigation can be operated during the windy periods frequently seen in Colorado.
The mold spots on house siding and the staining and deterioration of wood privacy fences experienced with overspray from sprinkler irrigation is eliminated with the use of drip. Because water doesn’t leave the landscape with drip irrigation, pavement deterioration associated with sprinkler irrigation runoff is eliminated.
Properties with old, galvanized steel water service lines where corrosion has resulted in a narrowed diameter may benefit from a retrofit to drip irrigation. The low volume requirements of drip irrigation are a good match with restricted supply lines.
Drip systems can be managed with an AC or battery powered controller. Automated landscape irrigation is an advantage to many people with busy lifestyles.
Adaptable and changeable over time, drip systems can be easily expanded to irrigate additional plants if water is available. Emitters can be simply exchanged or removed and emitter lines eliminated or repositioned. When plants are removed or die, drip lines should be plugged.
Disadvantages
If emitters are poorly placed, too far apart or too few in number, root development may be restricted by the limited soil area wetted. Water seeping at ground level is hard to see and makes it difficult to know if the system is working properly. An indicator device that raises and lowers a flag to show when water is flowing is available to overcome this issue.
Regular maintenance inspections are needed to maintain system effectiveness – the same as with high pressure sprinkler systems. Clogs are much less likely with filtered water and proper pressure regulation used in combination with self-cleaning emitters.
Drip tubing can be a trip hazard especially for dogs and children but is less problematic if covered with mulch and fastened with wire anchor pins every 2 to 3 feet. Drip lines can also be easily cut while undertaking other landscape maintenance activities.
Where to Drip: Placing Emitters
Drip irrigation emitters must be placed so that water reaches the roots of plants. Roots will grow where conditions are favorable, primarily where there is the right balance of water and air in the soil.
Design the drip system around the irrigation needs of the plant. For new plantings, make sure emitters are placed over the root ball. Initial placement on perennials is often permanent unlike trees and shrubs that require emitters to be moved away from the trunk and others added as plants grow. Generally, larger plants have larger and more extensive root systems. A greater number of emitters is needed with larger plants and higher water-using plants. Fewer emitters of lower flow are needed with lower water-using plants or plants that will receive only occasional water following establishment.
Drip emitter placement is also related to whether the soil is sand or clay. To compensate for variations in lateral movement of water in the soil, locate emitters 12 inches apart in sand, 18 inches apart in loam, and 24 inches apart in clay. If one to two emitters are recommended for a plant in a clay soil, two or three may be required in a sandy soil to wet a sufficiently wide soil area.
Devices
There are two types of emitters: pressure sensitive and pressure compensating. Pressure sensitive emitters deliver a higher flow at higher water pressures. Pressure compensating emitters provide the same flow over a wide pressure range. More products made in recent years are pressure compensating. Turbulent flow and diaphragm emitters are non-plugging. Emitters can be attached into the mainline or placed on the ends of ¼ inch microtubes. Because emitters are generally color-coded by flow rates, purchase all emitters from one manufacturer because color codes differ among manufacturers.
|
In clay or loam soils, consider two 0.5 gph emitters at the base of a perennial flower to ensure watering if one fails. A 1 to 5 foot shrub and small tree less than 15 feet at maturity will initially require two, 1 gph emitters 12 inches from the base of the plant. Change to 2 and then 4 gph higher flow emitters if planting a larger sized tree and as the small tree grows. A 5 foot or larger shrub may require three 1gph emitters. A medium tree 15 to 25 feet may ultimately require four emitters two feet from the trunk. If planting a “whip”, it’s possible to start with two 0.5 gph emitters and change to higher flow and more emitters as the tree grows. Begin with three, 2 gph emitters on a 1 inch caliper tree planting and three, 4 gph emitters on a 2 inch caliper tree at planting. Trees larger than 25 feet at maturity may be impractical to irrigate with drip because of the extensive nature of tree root systems and mass of the trees. Increase the number of emitters and change them to 2 or 4 gph or larger flows as trees and shrubs grow. |
Emitter tubing is useful for closely spaced plants. Turbulent flow emitters are manufactured into the mainline at pre-set spacings. Spacings in ¼ inch tubing are typically 6, 12 or 24 inches. A wider range of spacings are available in ½ inch tubing, including 9, 12,18, 24, 36 or 48 inches. The in-line emitters are self-flushing and clog resistant as long as system water filtration with 200 mesh filters is used. Emitter tubing irrigates evenly over its entire length. Laser tubing and soaker hoses have holes in tubes but do not contain emitter devices for precise metering of water; the amount of water released varies along their length making them less satisfactory for maintaining plants.
Bubblers are devices that emit higher flows of water in a circular pattern. They are useful for irrigating larger plants such as roses and shrubs, and for filling basins around newly planted trees or shrubs. Some can be adjusted for flows from 0 to 35 gph.
Microsprays emit large droplets or fine streams of water just above the ground. They are available with nozzles in full, half and quarter circle patterns that wet diameters varying from 18 inches to 12 feet. They should be placed on a separate zone from other drip devices because of their greater water use that can vary from 7 to 25 gph. Fewer microsprays can be placed on a zone than emitters due to their high flow rates.
These devices are low pressure but share characteristics with high pressure sprinklers. Pop-up micro-sprayers are now available, eliminating a permanent irrigation riser in the garden. They are not as efficient as ground-applied water from drip emitters and care must be used to avoid over-pressurization and misting.
Misters and foggers are not recommended for landscape use.
Typical System Setup
A drip system is easy to install for the do-it-yourselfer because the mainline does not need to be trenched into the ground as is the case in sprinkler installations. If tubing is not in the ground, the wire anchors holding the tubing in place may be forced out of the ground and require reinsertion.
| Water quality is important for the proper operation of a drip system. Filtration to remove algae, sand and other materials is very important to drip systems. Elaborate filters and more frequent cleaning will be necessary with water from wells or ponds that may contain algae. |
The point of connection to a water supply can be a pump from a well or pond, one valve among those in a high pressure sprinkler system, or a faucet (hose bib). It can even be a high pressure sprinkler head using a kit to convert it to drip. Keep in mind that other heads in that zone must be capped because sprinklers and drip cannot be mixed within the same zone.
In permanent systems, the order of equipment is backflow prevention device, control valve, filter then pressure regulator. Valves are solenoid types generally automated with a controller. In add-on drip systems with a head assembly attached to an outside faucet or hose, a faucet valve may precede the backflow device. The valve is opened with a manual turn of a faucet handle or with a mechanical or battery operated timer attached to the faucet. The head assembly in this case would consist of a manifold of backflow preventer, filter and pressure regulator.
A backflow prevention device is critical to preventing contamination of household potable water. Small antisiphon devices are available that screw onto a hose bib for add-on systems. Contact your government building department or water provider to find out what backflow prevention is required locally.
| Consider soil type, plant water requirements and season when setting and adjusting irrigation times. More water will be required in peak summer heat than in cooler spring and fall temperatures so change run times accordingly. |
A 150 to 200 mesh filter can be used for relatively clean municipal water. Filters with a higher mesh count have a greater screening capacity. Y or T filters are convenient because they don’t require dismantling connections for cleaning as do in-line filters.
A pressure regulator is essential for maintaining pressure that meets product manufacturer specifications. Take into account the pressure that will be needed for elevation changes. Add 5 psi to the operating pressure for every 10-foot rise in elevation above the point of connection to the water source. Pressure compensating emitters minimize low head drainage.
Design and Layout Tips
Use high quality components that will last for many years.
A Y-connector is convenient on a drip system connected to a hose bib because a garden hose can be connected to the other side.
Dedicate separate zones to drip irrigation. You cannot mix high-pressure sprinklers and drip on the same zone even if one sprinkler head is used with a conversion kit as a point of connection for the drip system.
You can mix drip devices on the same zone to meet the needs of many different plants but don’t mix micro-sprays with drip emitters.
Limit mainline to 200 feet in a single zone. Use ½ inch polyethylene mainline on small to medium properties where maximum flow per zone will not exceed 200 gph (figure is conservative and may be 250 or higher because different manufacturers produce pipe with varying inside diameters). On medium to large properties, choose ¾ inch tubing to increase maximum available flow rate to 480 gph per zone. If the source flow is less than mainline capacity, the source gallons determine the attachable components per zone.
Add the flow rate of all emitters, emitter tubing and components used in a zone to make sure you have not exceeded the maximum flow for the zone. For example, fifty 2 gph emitters require 100 gallons of flow per hour (50 x 2 = 100 gph).
To evaluate source flow rate, run water full force from an outside faucet and note the number of seconds it takes to fill a bucket. Calculate the gallons of flow per hour (gph) by dividing the bucket size in gallons by the number of seconds required to fill it, then multiply by 3600 seconds for gallons per hour.
 |
The maximum flow is considered to be 75 percent of the flow rate. This is the largest number of gallons available for use at one time while operating a zone. Note that even though the source flow gallons may be higher than held by a ½ or ¾ inch mainline, the maximum line gallons limit the number of components per zone that can be attached to the mainline.
Snake mainlines through the landscape to avoid straight runs and allow for expansion and contraction. Don’t kink; use right angle connectors in tight corners. Use wire anchors every 3 feet to keep lines in place.
Install mainline above weed fabric and under mulch to keep it out of sight and prevent a trip hazard. This will also minimize light exposure and maximize useful life.
If source pressure is low, use drip components designed to operate at low pressures between 15 and 20 psi. Locate at least one drip emitter at the lowest point in the system or install a valve there so the lines can be drained for winter.
Operating the system
Systems are generally designed to operate for one hour of run time per week after plant establishment. Adjust emitter sizes and numbers accordingly. Watering twice per week may be required after planting on sandy soils or on plants requiring regularly moist soil. However, for native or xeric plants that don’t grow well on regularly moist soils, operate the system weekly or every couple weeks on established plants and let soil dry out in between. Such plants include pinyon pine, Apache plume, Nepeta, Centranthus, most Penstemons, Artemesia and many Salvias.
Irrigate Xeric perennials initially with 1 gallon per week. Extend the time between watering once established. Equip perennials and annuals using moderate amounts of water with emitters or emitter tubing to receive 2 gallons per week.
A shrub the size of a plant growing in a 5 gallon nursery container should receive 4 to 6 gallons weekly. Add more emitters per plant for higher water using shrubs and reduce the emitter flow size for more xeric shrubs. Large shrubs may require 10 to 12 gallons of water weekly. Monitor the soil moisture to check that you are not overwatering as too much water kills many newly planted plants.
| Overwatering with drip systems is common, especially with manually operated systems. To avoid this, use a mechanical or electronically operated controller. Do not run a drip system overnight with the thought that water is applied very slowly. |
Established trees may require up to 10 gallons weekly per inch of trunk diameter. For example, a tree with a 2-inch trunk diameter may require 15 to 20 gallons per week (2 in. diameter x 10 gals/diameter inch = 20 gallons). With a compact root ball at planting, amounts to water new trees are less than established trees with a wide-ranging root system. For a new-planted “whip,” 1 to 2 gallons per week are often sufficient. For a 1 inch caliper new-planted tree, 6 to 8 gallons weekly is an initial target amount. For a 2 inch caliper tree, consider 10 to 12 gallons weekly at planting.
Use the above guidelines as a rough initial guide and then check the soil moisture at the rooting depth of the plant the following day. Adjust irrigation run times accordingly.
Properly prepare your soil by mixing in a soil amendment before installing the drip system and plants. Overwatering on a poorly drained soil that was not well-prepared commonly kills plants.
Maintenance
Before irrigating for the first time in spring, flush the mainline to clear any accumulated dirt. Clean the filter. Cap the system, pressurize and check emitters to be sure they are operating. Clean emitters if necessary by soaking in water and using forced air to clear particles.
During the growing season, periodically check and clean emitters for proper operation. Flush the system thoroughly after a break and repairs to avoid emitter clogging. Clean the filter more often if using well or pond water and less often if using municipal water.
Winterization tasks for drip systems are minimal. Detach the head assembly, which consists of the control valve (if portable), backflow prevention device, filter and pressure regulator and store indoors for winter.
Uncap the mainline to drain, especially if an emitter is not located at the low point in the system, then re-cap. Poly mainline will not be damaged by freezing. Systems with many right angle fittings may retain water and require pressurized air to blow out. Most emitters store well outdoors over winter and only occasional replacement is necessary. If check valves are present, use care to drain the system and blow it out.
Glossary of Terms
Backflow prevention device – a device that prevents contaminated water from being sucked back into the water source should a reverse flow situation occur.
Bubbler – a water emission device that tends to bubble water directly onto the ground or that throws water a short distance.
Control valve – a device used to control the flow of water. Control valves turn water to the individual zones on and off.
Drip irrigation – a method of irrigation using the slow application of water under low pressure through tube openings or attached devices just above, at or below the soil surface.
Drip line – the circle that could be made on the ground around a tree below the tips of the outermost branches of the tree.
Diaphragm emitter – emitters that contain a stretched membrane with a small opening. When particles plug the opening, pressure builds stretching the membrane until the particle is forced out. The membrane and opening then return to normal size.
Emitter – a dispensing device in a micro-irrigation system that regulates the flow of water released to the soil at the plant’s roots. Emitters are sold by flow rates and typically are ½, 1, 2 and 4 gph. They may be found as high as 5, 7, 12, 18 and even 24 gph.
Filter – a canister device with a screen of a specified mesh to catch particles large enough to clog emitters.
Fittings – the array of coupling and closure devices used to construct a drip system including connectors, tees, elbows, goof plugs and end caps. Fittings may be of several types including compression, barbed and locking.
Flow – the rate or amount of water that moves through pipes in a given period of time. Flow is expressed in gph, gallons per hour with micro-irrigation (drip) devices as opposed to the gpm, gallons per minute rate used for high-pressure sprinkler systems.
Goof plugs – insertable caps to plug holes in mainline and microtubes where drip devices have been removed or aren’t needed.
Mainline – tubing used in the drip system and is sometimes called lateral line. It is a soft polyethylene material and comes in ½ or ¾ inch diameters.
Micro-irrigation – an updated term adopted by the American Society of Agricultural Engineers for drip or trickle irrigation that also includes micro-spray and other new devices operating at low pressures. Water is applied frequently just above, on or below the surface of the soil at low flow rates with the goal of placing a quantity of water in the root zone that nearly approximates the consumptive use of the plant.
Microspray – a low pressure sprayer device generally placed on a stake that is designed to wet soil with a fan or jet of water.
Microtubes (spaghetti tubes) – the ¼ inch flexible pipe used to link emitters or sprayers to the mainline. Plastic stakes are frequently used to hold the tubes and the dispensing device attached to the end in place.
Mister – a device that delivers fog-like droplets of water often for cooling purposes.
Pressure – the force propelling water through pipes. Common household static (non-flowing) pressure is 50 to 70 psi (pounds per square inch). Irrigation systems operate under dynamic (flowing) water pressure that is reduced with elevation gain and friction loss through rubbing on the sides of pipes. Long lengths of pipe generally result in low pressure at the ends of the run. Divide a large irrigation zone into smaller ones, minimize attached components, or choose larger diameter pipe to assure adequate dynamic operating pressures.
Pressure-compensating emitter – an emitter designed to maintain a constant output (flow) over a wide range of operating pressures and elevations.
Pressure-sensitive emitter – an emitter that releases more water at the higher pressures and less at lower pressures found with long mainlines or terrain changes.
Pressure regulator – a device that reduces incoming water pressure for low-pressure drip systems. Typical household water pressure is 50 to 60 psi while drip systems are designed to operate at around 20 to 30 psi depending on the manufacturer.
Turbulent flow emitter – emitters with a series of channels that force water to flow faster not allowing particles to settle out and plug the emitter.
Zone – the section of an irrigation system that can be operated at one time by means of a single control valve.
Additional Information
Drip irrigation for windbreaks, Walter Trimmer and Brian Chandler, University of Nebraska NebGuide 525.
Operating and Maintaining a Home Irrigation System, C.R. Wilson and D. Whiting, Colorado State University Extension fact sheet no. 7.239.
*C. Wilson, former Colorado State University Extension horticulture agent, Denver County; M. Bauer, CLIA, irrigation specialist, Eagle River Water and Sanitation District, Vail. Reviewed by Kurt Jones, Colorado State University Extension agent, Chaffee County. 9/98. Revised 7/14.
Go to top of this page.