by C.R. Wilson and D. Whiting* (5/20)
Revised by K.M. Jones**
Quick Facts…
- Efficient irrigation requires a quality sprinkler system design, excellent water management skills and regular system maintenance.
- Tune ups and renovations of home sprinklers greatly improve water coverage resulting in both better plant growth and water savings.
- Seasonal adjustment of irrigation controllers yields substantial water savings and better plant health.
- New technologies will likely result in improved water management.
- An irrigation audit can point to where water savings can be achieved.
Colorado’s growing population relies on limited water resources provided by a semiarid climate. Periodic droughts, characteristic of the West, limit the total water supply available for outdoor landscape watering, indoor consumption, manufacturing, agriculture and other uses.
Irrigation technology has led to the widespread installation of in-ground, home sprinkler systems. It should be noted that hand-setting sprinklers attached to garden hoses has been shown to be equally or more efficient than watering landscapes with in-ground systems.
Efficient landscape water application has become a goal of many communities, water utilities, and individuals. The average home landscape uses as much as 50 percent of the total water consumed in a given household. Regardless of the type of plants grown, a tune-up of home irrigation systems can yield substantial water savings. Attention to sprinkler system management, maintenance, and needed renovations can conserve water while producing better plant growth.
Improved Management Water Savings
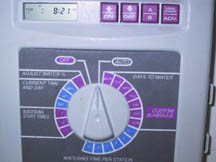
Figure 1: An irrigation controller with capability for changing water percentage for seasonal adjustment, and setting multiple start times for irrigation cycling.
Changing sprinkler system settings on the controller (also called a clock or timer) are the easiest water-saving changes to make. Set zones (stations) to apply the amount of water needed by the particular plants grown. Different types of plants have different water needs. Set the controller to the needed run time in minutes. Change controller run times to meet seasonal plant needs. Plants require less water in cool spring and fall periods, and more water in the heat of summer. For example, bluegrass lawns may require 0.6 to 0.9 inches of water per week in spring and fall, but need 1.25 to 1.5 inches per week in midsummer. Some controllers allow watering a percentage of peak summer run time settings (Figure 1). With one setting change, they can easily be reset to 60 percent for spring and fall watering.
Practicing seasonal adjustments not only conserves water, it results in healthier plants by matching water applied to plant needs. Too much water is often applied to clay soils depriving plant roots of the oxygen they need to function. Applying the right amounts of water produces healthier roots.

Figure 2: Cycling can minimize this water runoff.
Match run time to exposure. A shady or northern exposure will likely require only 1/2 the water of a level, sunny landscape. A south or west-facing slope may require two times the water of a level landscape area that is in full sun. Adjust run times on the controller accordingly.
Deep and infrequent watering encourages deeper rooting in clay soils. Roots will grow deep only if soils are not saturated with water at deeper depths (12 inches). Plants that have the ability to grow deep roots are able to tap water found in deeper soil depths. Careful watering avoids the water waste that occurs when water drains below the root zone.
If water runs off clay soil or slopes (Figure 2), consider “cycling,” splitting irrigation times into two or three parts. Cycling (also called cycle and soak) involves irrigating, shutting off the zone to allow water to soak in, then irrigating the remainder of the required time. For example, a 14-minute run time may be irrigated for 7 minutes, turned off while the controller advances to irrigate another zone, then irrigated for the remaining 7 minutes to achieve the total 14-minute run time.
To determine how long a cycle should last, start the sprinklers and time the number of minutes until water runs off. The number of minutes will vary with each zone depending on the degree of slope, soil type, amount of compaction, and other factors. Use this number as the maximum time to water before shutting down the zone and allowing for a soak period. Set multiple start times on the controller for cycle and soak irrigation.
Maintenance Water Savings
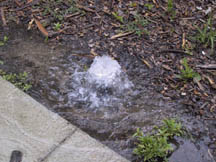
Figure 3: A broken sprinkler head wastes water.
Over time, wear and breakage in a sprinkler system leads to water waste and malfunctions. Maintenance is required on an ongoing basis to make efficient use of water. For example, missing or broken heads will cause wet spots and water runoff from the landscape (Figure 3). Replace heads immediately. Sprinklers positioned to spray hard surfaces cause water runoff and often dry spots in landscapes. A spray head nozzle can easily be unscrewed, removed, and then reinserted in the body aligning the nozzle pattern with the plants to be irrigated.
Clogged nozzles or broken rotors also cause dry spots (Figure 4). Nozzles can easily be unscrewed, the filter underneath cleaned, and the nozzle then rethreaded onto the stem. Nozzles may also wear with time warping spray patterns. Unscrew and replace with new nozzles.
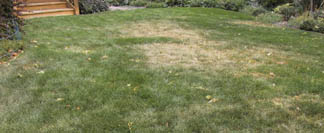
Figure 4: Dry spot in lawn.
Adjust sprinkler heads to be perpendicular to the soil surface. Tilted heads warp the spray pattern throwing more water to one side and less to the opposite one. Tilted heads cause dry spots in the landscape and are very common due to strikes from mowers and foot traffic.
All heads on a zone should be of the same type with the same manu-facturer’s precipitation rate (amount of water sprayed in inches per hour). If heads are mixed, the landscape receives too much water in one area and too little water in other areas. For example, rotor heads (Figure 5) release 1/3 the amount of water of spray heads (Figure 6) in the same run time. Do not install rotors and spray heads on the same zone.

Figure 5: Rotor heads rotate slowly sending out one or more streams of water to cover areas larger than spray heads.
Water that constantly seeps from a sprinkler head indicates a leak in a control box valve. Turn off water source and inspect. Replace leaky valves in the valve box.
Operate systems under the recommended pressure to avoid misting. Over-pressurized heads emit a mist that blows away, wasting water. Consider an in-line pressure regulator for areas with high water pressure. Low pressure causes large droplets of water that fall short of the intended area. Consider using a different head or nozzle that requires less pressure. In severe low-pressure situations, a booster pump may be required.
Renovation Water Savings
A thorough system renovation may pay for itself within a few years. Renovations make additional water available to the community, make the system easier to maintain, and result in better landscape health.
Irrigation systems should be designed for water conversation while effectively watering plants. For example, the spray from one head should extend to touch the next spray head. This is called head-to-head coverage. Where sprinkler heads are located far apart, uniform water coverage will never be achieved.
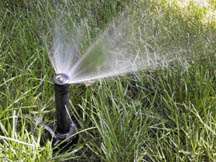
Figure 6: Pop-up spray heads produce a static spray band of a set pattern depending on the type chosen (1/4, 1/2, 3/4, full, or variable circle). Heads rise when water is turned on and retract when not in use.
Position spray heads in square or triangle patterns to achieve the overlap recommended by the manufacturer. It is nearly impossible to irrigate small areas that extend out from the main mass of the landscape because recommended overlaps cannot be achieved. Cut off these small, landscape extensions and convert them to hardscape (paved) areas or beds irrigated with a drip (micro-irrigation) system.
Older systems may have inefficiencies such as stationary spray heads that don’t pop up above the grass blades. These heads do not allow grass to be mowed at the 3-inch recommended height because high grass will block the spray. Short-rise heads often result in the need to apply more water due to less self-shading by short-mowed grass. Updating older systems or abandoning and replacing them may lead to greater water efficiencies.
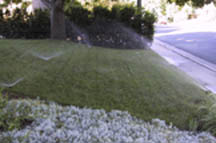
Figure 7: Line hardscape areas with heads to throw water back into the landscape, never within the landscape throwing water towards the hardscapes.
Use water sensors to shutoff systems when water is not needed. Although manual overrides can achieve the same result, for people that are often away from home, rain sensors can be useful. Automatic rain shut-off turn off controllers when there is sufficient precipitation. Soil-moisture sensors likewise shutoff systems when soil remains moist and irrigation is not needed. These devices can be problematic because soils in different exposures may dry at different rates. This makes it difficult to regulate water applications over the total landscape with one soil-moisture sensor.
Future Advancements on the Horizon
New advancements in technology have the potential to revolutionize landscape watering. ET (evapotranspiration) controllers adjust run times by calculating the correct amount of water to apply. This takes the guesswork out of programming watering times. ET controllers use broadcast or line-transmitted data based on current weather station information. If current data is not available, normal (historical) ET information can be programmed into the controller for the calculations. These devices are available and will likely become more common over time.
Evapotranspiration (ET) is the water used by plants per day or week. It includes water taken into plants and evaporation from the soil surface. ET is affected by weather (solar radiation, temperature, wind, humidity) and the stage of plant growth.
Tests are currently underway for a new and efficient method for irrigating lawns and planted beds. Subsurface drip irrigation lines are buried, eliminating water loss through wind drift and evaporation waste. Time is needed to determine how this technology performs over many years.
Irrigation Check-ups
The following questions will help you inspect a home irrigation system and correct many of the problems you find. The result should be substantial water savings for you and your community. Note that some communities, water utilities, Colorado State University Extension offices, and businesses offer landscape water audits for those who want this service.
Step 1. Examine the condition and type of irrigation heads. Make regular checks for damaged or missing spray heads and leaking lines. Are there heads that spray a hard surface or that leave part of the landscape without water? Are any nozzles Are irrigation heads buried by surrounding grass or other plant growth? Twist to raise or dig out and reposition heads on flexible risers (swing pipe), or add a threaded riser to raise heads on inflexible risers to grade level.
What type of heads are installed? Spray heads deliver the same amount of water in 1/3 the time of rotors. Rotor heads are well suited to irrigating large turf areas and are rated more efficient than spray heads. Set a zone
with rotor heads to run three times the number of minutes of a spray head zone if the same amount of water is required on the two landscape locations. The heads on one zone should all be of the same type. Replace different heads so all the heads within the same zone match.
Step 2. Is the area level or on a slope? Slopes and berms are hard to water efficiently because the water applied naturally runs off. Nozzles with a lower precipitation rate may be required on slopes in addition to using cycle and soak applications. Adjust run times on the controller accordingly.
Step 3. Evaluate dry spots. Dry spots may be caused by poor coverage if irrigation heads have been installed too far apart or not in a recommended square or triangle pattern. Other causes can be low system water pressure, a plugged nozzle, failing rotor, or a south, west or windy exposure.
Step 4. Evaluate wet spots. Wet areas may be due to normal system drainage – draining of water to the lowest point (head) in a zone after the zone shuts off. Wet spots could also be present in north-facing exposures or shaded areas that are over-irrigated. However, a leaky valve that causes constant seepage out to the heads is like a dripping indoor faucet. Open the valve box and either replace worn diaphragms in the solenoid valves, or with sealed units, replace the entire valve.
Step 5. Is the exposure full sun, shade, southwest slope, or something else? Adjust run times on the controller accordingly. A shady or northern exposure will likely require 1/2 the water of a level, sunny landscape. A south or west-facing slope may require two times the water of a level landscape area that is in full sun.
Step 6. What type of plants are being grown? Group plants with similar water requirements together and water appropriately. An established border of medium to low water-using shrubs require less irrigation than bluegrass turf or a vegetable garden.
Step 7. Calculate precipitation rates and determine run times to set the controller. If you are unsure or need to confirm the manufacturer’s ratings of how much water spray heads deliver per hour (precipitation rate), follow these steps. Place four identical, straight-sided cans between irrigation heads in a zone. Operate the zone for 15 minutes. Pour water from three of the cans into the fourth. Use a rule and measure, in inches, the depth of water collected in can four. Because each can represents 15 minutes or one-quarter hour of collection time, the total water in the fourth can represents four times 15 minutes or one hour of collection. Therefore, the water measured in can four is the sprinkler precipitation rate in inches per hour for that zone.
| To convert precipitation rates to minutes of run time for a zone, divide the water you want to apply in inches (ET) by the precipitation rate calculated in inches per hour, and multiply by 60 minutes per hour. The result is the run time in minutes for setting the controller. |
Look for these and other technologies as you are installing new or renovating old sprinkler systems:
Efficiency of various irrigation methods
Subsurface drip – 90%
Surface drip (micro)irrigation – 85% Large rotors – 70%
Small rotors – 65% Spray heads – 50%
*C.R. Wilson, former Colorado State University Extension horticulture agent, Denver County; D. Whiting, Extension consumer horticulture specialist, department of horticulture and landscape architecture. Revised by Kurt Jones, Extension agent, Chaffee County.4/03. Revised 5/20.
Colorado State University, U.S. Department of Agriculture and Colorado counties cooperating. Extension programs are available to all without discrimination. No endorsement of products mentioned is intended nor is criticism implied of products not mentioned.
Go to top of this page.