Block Style Garden Layout
Block style garden layouts (also called close-row or wide-row plantings) increase yields fivefold compared to the traditional row-style garden layout, and fifteen-fold for the smaller kitchen garden vegetables. The compact design reduces weeding and is ideal for raised bed gardening.
The basic technique used in a close-row, block planting, is to eliminate unnecessary walkways by planting vegetables in rectangular-shaped beds or blocks instead of long single rows. For example, plant a block of carrots next to a block of beets, followed with a block of lettuce, and so forth down the bed area.
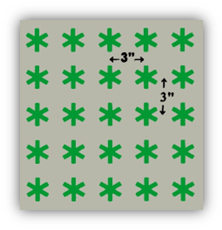
Plant crops with an equal distance of space between neighboring plants in both directions. For example, space a carrot patch on three-inch-by-three-inch centers. It may be easier to visualize this plant layout as running rows spaced three inches apart across the bed and thinning the carrots within the row to three inches. A twenty-four foot long “traditional” row of carrots will fit into a three foot by two-foot bed. [Figure 1]
Design the planting beds to be three to four feet wide and any desired length. This width makes it easy to reach into the growing bed from walkways for planting, weeding, and harvesting.
Limiting foot traffic to the established walkways between planting beds reduces soil compaction. Design walkways to eighteen to twenty-four inches wide. Mulch walkways with dry grass clippings, wood chips, or other organic mulch. As the vegetable foliage grows together, the shade cast suppresses weed germination.
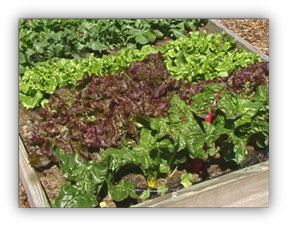
After harvesting a row of radishes, beets, lettuce, or spinach, replant for continual summer production. [Figure 2]
Due to the higher plant density, block plantings require a weed-free, fertile, well-drained soil that is rich in organic matter. Give extra attention to watering and frequent, light fertilization to nourish the dense plant population. Avoid over-crowding vegetables; reduced air circulation can increase disease problems.
Suggested Spacing
Suggested spacing for kitchen garden vegetables: (Start with the wider spacings, reducing spacing with experience and as soil improves fertility and tilth.)
- Beets: 4-6” by 4-6″
- Carrots: 2-3″ by 2-3″
- Celery: 7-9″ by 7-9″
- Garlic: 4-6” by 4-6″
- Kohlrabi: 7-9″ by 7-9″
- Leeks: 4-6” by 4-6″
- Lettuce, head: l0-l2” by 10-12″
- Lettuce, leaf: 7-9″ by 7-9″
- Onions, bunching: 2-3″ by 2-3″
- Onions, dry: 4-6″ by 4-6″
- Parsnips: 5-6″ by 5-6″
- Radishes: 2-3″ by 2-3″
- Spinach: 4-6″ by 4-6″
- Swiss Chard: 7-9″ by 7-9″
- Turnips: 4-6″ by 4-6″
Other Vegetables Suited to Block Planting
Cole Crops: Broccoli, Brussels Sprouts, Cabbage, and Cauliflower – Space at eighteen inches by eighteen inches or three plants across a four foot bed.
Corn – Always plant in a block to facilitate pollination. Five rows wide is recommended for the best “pollen shower” to maximize kernel set; three rows wide is minimum. Space at twelve inches by twenty-four inches or four rows across two, four-foot wide beds.
Eggplant – Space at eighteen inches by twenty-four inches by eighteen inches by twenty-four inches, or two or three plants across a four-foot wide bed.
Peppers – Space at fifteen inches by fifteen inches, or three plants across a four-foot wide bed.
Potatoes – Space at twelve inches by fifteen inches by twelve inches by fifteen inches, or three plants across a four-foot wide box.
Vine Crops: Squash, Cantaloupes, Pumpkins, and Watermelons – Place a single row down the center of a four foot wide box. They may also be planted in larger blocks, several rows wide. Place the winter squash and pumpkins in the center of the block and cantaloupes, watermelons, and summer squash around the edge where they can be reached for summer harvest.
Tomatoes and Cucumbers – Need to be trellised to save space and make harvest easier. The increased air circulation around trellised tomatoes helps suppress tomato blight. Space trellised tomatoes a minimum of twenty-four inches apart down a single row, in a block two to three feet wide. Plant cucumbers along a trellis at nine by twelve inch spacings.
Beans and Peas – May be easier to pick and are less disease-prone if planted in single or double rows, rather than block style planting. Space beans twelve inches between rows and four inches between plants. Plant a double row down a block two to three feet wide.
Raised Bed Gardening
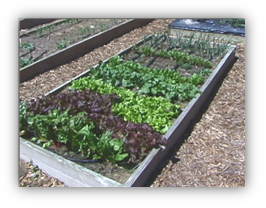
Raised bed gardens with block style layout [Figure 3] have many advantages, including the following:
Higher Yields and Less Area to Weed – The block style layout, eliminating unnecessary walkways increases yields by five-fold over the traditional row-path-row garden layout.
Reduced Soil Compaction – Established walkways keep foot traffic off the growing bed, reducing soil compaction.
Earlier Planting – The raised bed facilitates better runoff and drainage allowing soil to warm faster in the spring. Beds can be covered with plastic during spring rains, allowing for early planting even in rainy years.
Frost Protection – The block-style layout is easy to cover for spring and fall frost protection. It can also be shaded in the hot summer.
Soil Improvement – The raised bed is a clearly defined area where the gardener can concentrate on soil improvement techniques, (e.g., the addition of soil organic matter). In situations where the soil is poor, and limits plant growth, good planting soil may be added to the box.
Architectural Interest – Raised beds become an architectural feature of the landscape design.
Accessible Gardening – The raised bed is ideal for enabling persons with limited mobility to garden.
Constructing a Raised Bed
Size – A bed four feet wide is ideal for most vegetable crops, allowing the gardener to reach the entire bed from the side without ever stepping on the soil in the growing bed. Length can be whatever works for the space.
Tomatoes are well suited to a bed twenty-four to thirty-six inches wide, with one row of plants down the middle. Beans and peas are easier to pick in a single or double row down a bed rather than in the block-style planting. Here a bed twenty-four inches wide would be ideal.
Depth/Height – The height of the beds is generally of no consequence, assuming that crops can root down into the soil below the bed. For most home garden situations, the role of a raised bed is to define and separate the growing bed from the walkway. Here a four inch height would be adequate. Variations in heights (four inches, six inches, eight inches, and ten inches) among different beds may help create an appealing landscape feature.
In situations where the soil below is not suitable for crop growth, eight to twelve inches of soil is considered minimal. Deeper beds would make management easier.
To accommodate gardeners with special needs, bed height may be raised to minimize bending or to allow gardening work from a chair or wheelchair. Plan walkway space between beds wide enough to accommodate specialized equipment or mobility.
For ease of irrigation, beds should be reasonably level, both across and lengthwise.
Orientation – For frost protection, an east-west orientation has a slight advantage of collecting heat. For summer crop growth, a north-south orientation has a slight advantage of sunlight on both sides of the plant row each day. Because there is no clear advantage, orient the beds in whatever direction work best for the landscape design. Often beds are best arranged to be an appealing landscape feature of the property.
Construction Materials – A simple way to construct a raised bed garden is to use construction lumber (2x4s, 2x6s, 2x8s, and 2x10s). Untreated lumber will last for several years, except in high salt areas or wet sites. Treated lumber will last longer. Simply cut two pieces the width of the bed (typically four feet) and two others to the desired bed length. Using three and half to four inch decking screws, screw the corners together to make a four-sided box. Place the box-like frame on the soil and fill.
Various landscaping timbers may also be used in like fashion. Copper treated lumber is safe for garden boxes. However, do not use railroad ties (creosote cancer concerns) or CCA pressure treated lumber (removed from the market several years ago due to arsenic concerns). Brick or other building materials may also be suitable.
Raised beds may also be made without sides. Here, organic matter is mixed as the garden is tilled. Walkways are dug down with the soil thrown up on the bed. Beds are four feet wide at the base and three feet wide at the top. The entire bed is covered with organic mulch like dry grass clippings to prevent soil erosion and reduce compaction from rain and sprinkler irrigation.
Adding Soil
In the typical garden setting where crop roots will spread down into the soil below the bed, it is best to use similar soils. It may be beneficial to double-dig the beds. In double-digging, the top six inches of soil is moved from one side of the bed to the other side of the bed. Mix organic matter into the soil below the excavated side. Return the soil to the top, mixing in organic matter. Then repeat the process for the other side of the bed.
When adding soil, avoid creating a situation where one type of soil ends and another begins. This creates a line between soil types that impedes water and air infiltration and slows, or even stops, root penetration. If the soil being added to the bed is different from the soil below, mix some of the two together before adding the remainder to avoid a distinct line of change.
In situations where the entire rooting zone will be in the raised bed, a soil on the sandy side with 4%-5% organic matter would be preferred.
When purchasing soil, be aware that there is no legal definition of topsoil or planting soil. Just because it is commercially available in bulk or sold in bags, does not necessarily mean that it is good for gardening. Many bagged and bulk soils and soil amendments are prepared with compost made with manure and may be high in salts.
Gardening in a Raised Bed
Due to the high plant population, raised beds require better than average soils, and more frequent irrigation and fertilization. Concentrate on improving soils with routine applications of organic matter. For details on soil improvement and fertilization, refer to CMG GardenNotes #711, Vegetable Gardens: Soil Management and Fertilization.
Mulching – Mulch beds to control weeds, conserve soil moisture, and regulate soil temperatures. Grass clippings make great mulch when applied in thin layers (up to ¼ inches thick). Allow each layer to dry between applications. Do not use clippings from lawns treated with weed killers or other pesticides for at least four weeks after application. Wood/bark chips are great for mulching between the beds. Three to four inches of chips will minimize the compaction forces of foot traffic. However, do NOT mix wood/bark chips into the growing bed, it will interfere with seedbed preparation. For additional information on mulching, refer to CMG GardenNotes #715, Mulches for the Vegetable Garden.
Watering a Raised Bed – Drip irrigation is well suited to raised bed gardening. It is rather easy and inexpensive to add a water tap at the end of each box. Alternatively, simply move a garden hose in turn to each box and connect the drip hose. Sprinkler irrigation is also suitable, but less desirable due to potential disease problems. For details on irrigation, refer to CMG GardenNotes #714, Irrigating the Vegetable Garden.
As a point of clarification, raised bed gardening is a water conservation technique. It does require more frequent irrigation due to the higher plant density. However, it is more efficient resulting in higher yields for the amount of water applied compared to the larger areas watered in traditional row-walkway-row culture. Raised beds become even more efficient when watered with drip irrigation or soaker hoses on timers.
Frost Protection – An advantage of raised bed, block style layout is that the bed is easy to cover for protection from springs, rains, and frost, allowing for early planting.
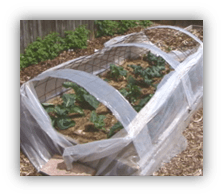
A Quonset-type cold frame covering made of concrete reinforcing mesh covered with plastic offers frost protection, and adds two to six plus weeks on both ends of the growing season for cool season vegetables. Any type of covering must be opened during the day to prevent overheating.
This publication, reference GardenNotes #713, is developed as part of the Colorado State University Extension Master Gardener Program.