Introduction
A pruning cut is a controlled wounding of a tree. Pruning a tree has potential negative consequences for its health, including reduced production of photosynthates, lower vigor, and creating pathways into the tree for decay organisms. To mitigate the risk pruning poses, a tree should only be pruned when needed (when there is a beneficial objective) and pruning cuts should be executed properly.
There are three types of pruning cuts: removal cuts, reduction cuts, and heading cuts, each of which is executed and used differently.
Note: In this publication, the term “trunk” refers to the trunk or parent branch, and “side branch” refers to the adjacent side branch arising from the trunk (parent branch). The same relationship exists between a side branch and secondary side branches.
Maximum Diameter of Pruning Cuts
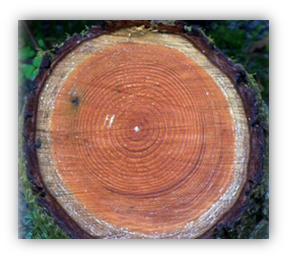
Ideally all pruning cuts would be made on branches two inches or less in diameter. Smaller cuts are more quickly covered with wound wood and avoid exposing large amounts of heartwood. Sapwood is the newer xylem rings. It is active in water transport and storage of photosynthates and is composed of both living and dead cells. Because it contains living cells it can actively resist the spread of decay organisms. On branches two inches and less in diameter, sapwood dominates the branch structure and in many cases is the only type of wood present.
Heartwood, the older xylem rings no longer active in water transport, has no way to actively resist decay. Due to chemical changes in these nonliving cells, heartwood is often darker in color. Depending on species and growth rates, heartwood becomes significant as branches reach two to four inches in diameter. [Figure 1]
Sometimes larger diameter cuts are needed to achieve critical pruning objectives. Any pruning cut larger than four inches needs to take into account the increased risk of decay organisms colonizing the tree’s wood through the cut.
Removal Cuts
Removal cuts (also known as thinning cuts or collar cuts) remove side branches back to the larger parent branch or trunk. If the branch union has a branch collar, removal cuts have the advantage of preserving the branch defense zone, providing a strong defense against internal decay.
Removal cuts reduce the canopy density but have little influence on height. Thinning with removal cuts allows better light penetration into the canopy, which encourages desired diameter growth of interior branches. Removal cuts reduce the weight on large branches, giving the tree resilience to snow loading. The primary use of removal cuts is in structural pruning of small, middle-aged and older trees and on shrubs.
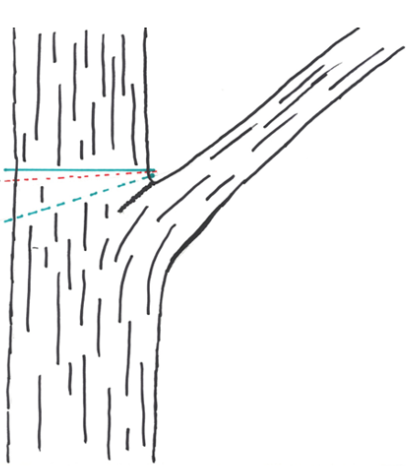
Two features on the branch, the branch collar and the branch bark ridge, help identify the proper cut angle. The branch collar is the area where the annual growth rings of the trunk overlap with the annual growth rings of the side branch, in a manner similar to shuffling a deck of cards. On some species, the branch collar is noticeable, while on other species the branch collar is less obvious. [Figure 3]
The branch bark ridge is where the bark from the trunk joins the bark from the side branch. Where they meet, the bark rises into a ridge. It mirrors the angle of attachment of the side branch. [Figure 3]
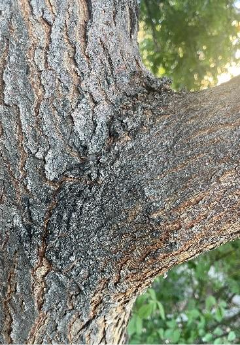
The branch bark ridge forms where the bark from the tree trunk meets the bark from the branch. The branch collar is a swollen area at the base of the branch where trunk tissue overlaps branch tissue.
Within the branch collar is a narrow cone of cells called the branch defense zone. [Figure 4] This area plays an important role by inhibiting the spread of decay organisms into the trunk. If the branch collar is injured or removed during pruning, the tree will be predisposed to decay organisms entering through the cut.
A primary objective in a correct removal cut is to preserve the branch collar.

Within the branch collar is the branch defense zone, a narrow ring of cells that effectively initiates a strong reaction in which chemical changes protect the trunk from decay. If the branch collar is cut or nicked in pruning, the defense zone may fail, predisposing the wound to decay.
With a removal cut, the final cut should be just beyond the branch collar. [Figure 5]
The final pruning cut is made just outside the branch collar and the branch bark ring.
In species where the branch collar is not clearly identifiable, look for the branch bark ridge. Make the final cut at the angle that mirrors (lies opposite) the angle of the branch bark ridge.
When a branch union has no branch collar (the side branch is greater than half the diameter of the adjacent trunk), tilt the angle of the final cut out a little more to minimize the size of the wound. Be aware that in the absence of a branch collar there is no branch defense zone to activate rapid woundwood growth and activate a strong reaction to suppress the potential for decay.
When removing a dead branch, the final cut should be just outside the branch collar of live bark tissue. If a collar of live wood has begun to grow out along the dead branch, remove only the dead stub, leaving the collar intact. Do not cut into living tissue. [Figure 6]
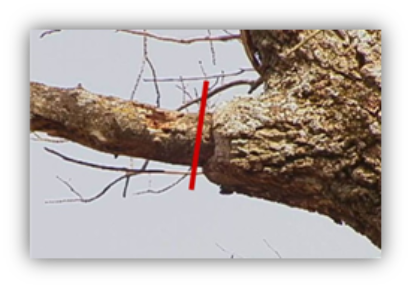
Do not cut into or otherwise damage the branch collar or woundwood growing around the dead branch.
Reduction Cuts
Reduction cuts remove a larger branch or trunk back to a smaller-diameter side branch. Reduction cuts are commonly used in training young trees. They are also the only type of cut that will significantly lower a tree’s height.
The branch removed with a reduction cut does not have a branch defense zone. This means that reduction cuts have a high risk of leading to decay, especially when they are larger than two inches in diameter. On trees under stress or in decline, avoid reduction cuts as they can accelerate the decline.
In a reduction cut, make the final cut straight across at the base of the branch being removed. If the branch is vertical add a slight angle to the cut to help with drainage. The exact angle is not critical as long as it is not flat on top (water needs to readily run off). [Figure 7]
To prevent undesired suckering at this point, the diameter of the smaller side branch should be at least one-third the diameter of the larger branch being removed. If the diameter of the smaller branch is less than one-third the diameter of the larger branch being removed, the cut is considered a heading cut and is generally unacceptable in pruning standards.
Heading Cuts
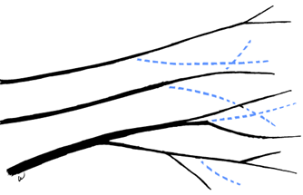
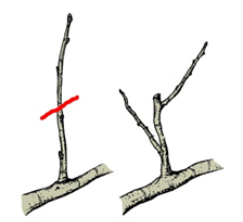
Heading cuts are made at a node (location where there is a bud) instead of at a union of branches. These cuts should be avoided in most landscape situations. These types of cuts remove the terminal bud which releases lateral buds below the cut allowing them to grow. This creates undesirable structure and necessitates that the resulting branches be thinned and/or suppressed. [Figure 8]
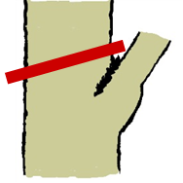
Another type of heading cut is the removal of a large trunk/branch back to a smaller side branch when the side branch is less than one-third the size of the larger trunk being removed. Structurally unsound water sprouts often emerge along the branch. This type of heading cut is very undesirable for most landscape trees. [Figure 9]
Three-Cut Method for Larger Branches
When removing any branch larger than one inch in diameter, use a three-cut method to protect the bark from tearing. [Figure 10]
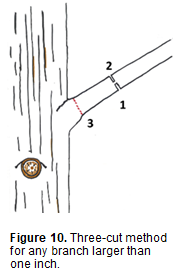
Cut One
Twelve to fifteen inches from the branch union (crotch), make an undercut approximately one-third to halfway through the branch.
Cut Two
Directly above the undercut make a second downward cut. The branch will break as you are making the second cut removing most of its weight. This double-cut method prevents the weight of the branch from tearing the bark below the collar. An alternative is to make the second cut a couple of inches out past the first cut.
Cut Three
Make the third and final cut at the correct pruning point. For example, on a removal cut, just outside the branch collar.
Wound Dressings
Generally wound dressings do not benefit a tree and in some cases they can be harmful. They can interfere with normal wound closure, may trap moisture in dead wood (compartmentalized wood or heartwood) and some dressings may harm plant tissue (i.e., they kill living plant cells).
Wound dressings can be used as part of a management plan for specific disease and insect issues which are not major factors in Colorado landscapes.
Time of Year to Prune
Dead, diseased, and damaged wood can be removed any time of year. Likewise, minor pruning of live wood (less than 10% of the foliage and/or only small diameter branches are removed) can be done any time of year on healthy trees. From a plant health perspective it is safer to prune a tree from late winter until late summer while the tree is not dormant.
Late winter: Pruning in the late dormant season (before buds swell) is a good time of year to prune most trees from a plant health perspective. Some species are prone to “bleeding” sap if pruned during this time of year. This is a cosmetic issue, but it can be avoided by pruning after the spring flush of growth is done. [Table 1]
| Birch | Kentucky coffeetree |
| Black locust | Maple |
| Elm | Mulberry |
| Golden chain tree | Poplar |
| Hackberry | Walnut |
| Japanese pagoda tree | Willow |
Spring to summer, following growth flush (as leaves reach full size, harden, and turn dark green) is considered a good time to prune.
Fall is generally considered an undesirable time to prune. It may stimulate canopy growth and interfere with winter hardiness.
Late fall to mid-winter is generally considered an undesirable time to prune. Cold temperatures can lead to cracking and damage wood exposed by pruning.
Drought. Do not remove live wood from trees in drought stress. This removes stored photosynthates that the tree is living on during the stress.
Pest management consideration. In some insect management programs, pruning may need to be timed before insect flight periods or avoided during insect flight periods.
Pruning Equipment
Hand pruners are used to cut small limbs up to ¼ to ½ inch in diameter (depending on the wood hardness). The bypass or scissor-type pruner (cutting as the blade crosses past the hooked anvil in a scissor action) is considered the best type. The anvil type (cutting as the blade pushes against the anvil) is more prone to tearing and mashing the tissues. The best advice on pruners is to purchase the best pair you can afford. It will last for years. Inexpensive pruners are short-lived.
In using bypass-type hand pruners, place the blade toward the tree with the anvil toward the outside. This allows for a closer cut. For bypass pruners, sharpen only the beveled edge of the blade pointing toward the anvil, never the anvil side of the blade.
Loppers are used for larger branches, generally up to two inches in diameter but should be used with caution as they can crush branches and damage tissues.
Pole pruners are used to cut small branches which cannot be reached from the ground. Making good pruning cuts with pole pruners can be difficult.
Handsaws are used for branches larger than ½ inch. There are two general types of tree saws. Tree saws with curved blades cut as the saw is pulled and are considered safer to use. Tree saws with straight blades cut as the saw is pushed. To remove the moist sawdust, tree saws have wider teeth spread than lumber saws. In a cut larger than one inch, a three-cut method should be used.
Chain saws are extremely dangerous. In the United States, 40,000 to 90,000 people have serious injuries, and 40 to 60 are fatally injured each year from chain saw accidents. Most accidents occur to the left leg, the shoulders, and the face. Chain saws should only be used by someone specifically trained in chain saw safety. A common accident occurs when the limb kicks back as the cut is being completed. Personal protective clothing is also needed. Safety glasses and boots are required by law. Helmet, hearing protection, gloves, and leg protection are also recommended.
This publication, reference GardenNotes #612, is developed as part of the Colorado State University Extension Master Gardener Program.