Introduction
This CMG GardenNotes outlines research-based tree planting steps. The procedures apply to deciduous trees, evergreen trees, and shrubs planted in a landscape setting (with the exception of roses). As you review the content, pay attention to significant clarification in the planting protocols. Based on the research consensus, it is not acceptable to plant a tree in a narrow planting hole with the burlap and wire basket or plastic container left in place.
The Science of Planting Trees
Tree root systems are shallow and wide spreading. [Figure 1] Based on nursery standards, a newly planted field-grown, balled and burlapped (B&B) tree or container-grown tree has less than 5%-20% of the fine absorbing roots of the same size tree in a landscape setting. Because of the reduced root system, this creates stress when the tree moves from daily care in the nursery to the landscape. The goal of this CMG GardenNotes is promoting rapid root growth to reduce the water stress imposed by the limited root system. Post-planting stress (transplant shock) describes the stress factors induced by the limited root system.

Steps to Planting Container-Grown or Field-Grown B&B Nursery Stock
PRIOR TO PLANTING: Call before you dig. Whether you plan on planting the tree yourself or hiring the work done, the site needs to have underground utilities marked before digging. In Colorado, this is easy to do by calling the Utility Notification Center of Colorado at 8-1-1 or 1-800-922-1987. It can also be done online at https://www.colorado811.org/. The utilities will be marked within seventy-two business hours, so plan ahead.
Step 1. Determine the Depth of the Planting Hole
Planting trees too deep is a common problem leading to the decline and death of landscape trees. Trunk-girdling roots, sometimes caused by planting too deep, can lead to early tree failure and loss.
Trunk-girdling roots develop when a tree improperly planted at the nursery (often being planted too deep in the ground or container) and/or the root ball is planted too deep in the planting hole. Trunk-girdling roots may lead to decline and death some twelve to twenty years after planting. Trunk-girdling roots may be above or below ground.
Numerous green industry groups have adopted the following techniques for tree planting. These are the recommended standards.
Depth of Root Ball in Planting Hole
In tree planting, the root ball should sit on undug soil. This prevents the tree from sinking and tilting as the soil settles. If the hole is dug too deep, add backfill, and firm the soil on the bottom of the planting hole to the correct depth. (Roots will grow out laterally from the root ball, not down.)
To deal with the soil texture interface (the differences in soil pore space) between the root-ball soil and backfill soil, it is imperative that the root ball sit slightly above grade with no backfill soil added over top of the root ball. Measure the height of the root ball and subtract 1 or 2 inches to account for the root ball sitting slightly above grade.
For small (1” caliper) trees, the top of the root ball should sit 1” above grade (subtract 1” from the total height of the root ball). For larger (2-to-4” caliper) trees, the top of the root ball should sit about 2” above grade (subtract 2” from the total height of the root ball).
Backfill soil should cover the “knees” (considered the edges of the root ball) tapering down to grade. [Figure 1] If the backfill covers the root ball, water and air may be slow to cross the texture interface. This may also result in decreased soil oxygen levels for roots. [Figure 2]


Depth of Tree in Root Ball
- Generally, at least two structural roots should be within the top 1-2” of the root ball, measured 3-4” from the trunk.
- On species prone to trunk-circling roots (crabapples, hackberry, linden, poplar, maple, and other species with fibrous root systems), the top structural root should be within the top 1” of the root ball.
Checking Depth of Tree in Root Ball
Check the depth of the tree in the root ball to determine where structural roots are located in the root ball so the planting hole depth can be adjusted (if necessary).
- The presence of the root flare is an indication of good planting depth. Be careful not to mistake the swollen graft union as the root flare.
- A good way to evaluate planting depth in the root ball is with a slender implement like a screwdriver. Gently probe the root ball three to four inches out from the trunk to locate structural roots and determine their depth. [Figure 4]
- If the tree is planted too deeply in the root ball, excess soil should be removed from the top in the backfill step of the planting process. Adjust the depth of the planting hole to compensate.

Summary: Depth of Planting Hole
The depth of the planting hole should be one to two inches less than the height of the root ball, adjusted (as needed) to correct for the depth of the tree in the root ball.
For example, if a two-inch caliper tree has a root ball height of sixteen inches, the depth of the planting hole would be fourteen inches. However, if the top structural roots are located five inches down in the root ball (i.e. five inches too deep), approximately three or four inches of soil needs to be removed from the top of the root ball in the backfill process. The depth of the planting hole would be adjusted to eleven to twelve inches.
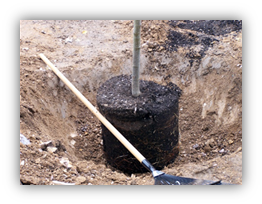
Step 2. Dig a Saucer-Shaped Planting Hole Three-Times the Root Ball Diameter
Saucer-Shaped Planting Hole
To support rapid root regeneration, research suggests a wide, saucer-shaped planting hole. If the roots have difficulty penetrating compacted site soil, sloped sides direct roots upward and outward toward the higher oxygen soil near the surface. Roots that do not penetrate into the site soil may begin circling in the hole, leading to trunk-girdling roots. [Figure 5]

When the planting hole is dug with an auger, cut down the sides of the planting hole with a shovel to help eliminate the soil glazing and create the preferred sloping sides.
Planting Hole Depth
The depth of the planting hole was determined in Step 1. To measure the depth of the dug hole, place a shovel handle across the hole and measure from the handle height to the bottom of the hole. [Figure 6]

For stability, it is imperative that the root ball sits on undug soil. If the hole is dug too deep, add soil back to the bottom of the planting hole, and firmly pack the soil at the bottom of the planting hole to the correct depth. Remember that the planting hole is shallow and wide. As a point of clarification, primary growth of roots is outward, not downward.
Planting Hole Width
The planting hole width is the key to promoting rapid root growth and reducing post-planting stress. In soils with great tilth (conditions supportive for ideal root growth), width is less of a concern.
However, in a compacted clayey soil, typical of much of Colorado, root growth slows when roots reach the undisturbed site soil beyond the backfill area. This is due to lower soil oxygen levels from compaction in the undisturbed soil. [Figure 7]
Challenges with making the hole twenty-five percent wider. A planting hole with vertical sides that is only twenty-five percent wider than the root ball decreases overall root growth. If the site soil is compacted and difficult to penetrate, the roots circle inside the hole just as if the root system were in a container. The size of the root system (before growth is slowed by site soil) is insufficient to reduce post-planting stress. Narrow planting holes are sometimes used as a labor-saving technique but are recommended if supporting tree health is the goal.
Challenges with making the hole two times the diameter of the root ball. A saucer-shaped planting hole twice the diameter of the root ball will allow the root system to grow rapidly to 150% of the root ball size before growth is slowed by site soil. However, this is not enough to fully avoid post-planting stress under normal conditions. A planting hole two times the root ball diameter is common in commercial plantings. However, it may slow root establishment.
Challenges with making the hole three times the diameter of the root ball. A saucer-shaped planting hole three times the diameter of the root ball allows the root system to grow rapidly to 400% of the root ball size before being slowed. This is enough to reduce post-planting stress under normal conditions. For example, a tree with a twenty-four inch (two foot) wide root ball needs a seventy-two inch (six foot) wide saucer-shaped planting hole. To promote root growth, the planting hole is wide, shallow, and saucer-shaped!
The shallow, but wide, planting hole is the primary technique for encouraging rapid root growth, which is the objective in the science of planting trees.
Summary: Planting Hole Specifications [Figure 8]

Modification for Wet Soils
In wet soils, raise the planting depth so that one-third of the root ball is above grade. Cover the root ball “knees” with soil, gradually tapering down to the soil grade. [Figure 9]

Modification for Compacted Soils
In extremely compacted soils, rototilling around the backfill area may be helpful. This should be done after planting is completed so the soil is not compacted by foot traffic during the planting process.
Planting on a Slope
When planting on a slope, plant “out-of-the-hill” by adjusting the grade around the planting hole as illustrated in [Figure 10]

Step 3. Set Tree in Place, Removing Container/Wrappings
In this step, techniques will differ for container-grown trees and B&B trees.
Container-Grown Nursery Stock
Container-grown nursery stock refers to trees and shrubs grown in containers using a variety of production methods. The spread of the root system is limited to the container size. An advantage of container stock is that it can be planted in spring, summer, or fall. Smaller trees and shrubs are commonly grown in containers.
There are many variations of container production. The most common container used is black plastic, though there are variations available in commercial production. It is estimated that over 80% of all nursery crops are grown in containers.
In container-grown nursery stock, circling roots can develop over time. [Figure 11] These may be on the outside of the root ball or on the bottom of the root ball. Circling roots may also be hidden inside the root ball.

Research found that slitting the root ball vertically on four sides does not adequately deal with circling roots. Updated recommendations state the outer 1-1½ inch of the root ball be shaved off with a knife or saw during the planting process. This removes the circling roots and directs roots to grow outward and does not affect tree growth potential.
Techniques with Container-Grown Stock
The planting techniques in this step will vary with the type of container and extent of root development. Generic steps include:
- Lay the tree on its side in or near the planting hole.
- Wiggle off or cut off the container, including removing any fabric. The ideal container-grown tree has a nice network of roots holding the root ball together. If some of the soil falls off (often on the bottom), it may be necessary to adjust the depth of the planting hole. Adjust the depth of the planting hole based on the new height of the root ball. If most of the soil falls off the roots, the tree should be planted as a bare-root tree (see below section on bare roots).
- Shave off the outer 1-1 ½ inch of the root ball with a knife or saw. This step is important to deal with circling roots. Discard the saved roots.
- Move the tree into place – limit using the trunk as a handle. The inside curve of the graft union should face north. [Figure 12]
- Check the depth of the root ball in the planting hole to ensure that the root ball is sitting about one inch above the soil grade. If incorrect, remove the tree and correct the planting hole depth, firming any soil added back to the hole.
- Align the tree vertically, adding soil to the base of the root ball as needed – check the tree from several angles to ensure the trunk is vertical/straight.
- Firm a shallow ring of soil around the bottom of the root ball to stabilize it and potentially eliminate the need to stake. [Figure 13]


Field-Grown, Balled and Burlapped Nursery Stock
Field-grown, balled and burlapped (B&B) trees and shrubs are dug from the production field with the root ball soil intact. After the harvest process, only 5%-20% of the feeder roots are retained in the root ball. B&B nursery stock is best transplanted in cooler weather, generally in spring or fall. When planting B&B trees in the summer, ensure that water is readily available during the entire planting and post-planting process.
To prevent the root ball from breaking, the roots are balled and wrapped with burlap (or other fabrics) and twine. There are many variations to B&B techniques. Some are also wrapped in plastic shrink-wrap, placed in an outer wire basket, or placed in a pot for easier transport. Larger plant materials are often sold as B&B stock.
Depending on how long the tree has been held as a B&B, circling roots may begin to develop. If this occurs, shave off the outer 1-1½ inches of the root ball as described previously for container-grown trees.
Techniques With B&B Nursery Stock
An advantage of the wider planting hole is that it gives room for the individual planting to remove the root ball wrappings AFTER the tree is situated in the hole.
Based on research, the standard recommendations are to remove the root ball wrapping materials (burlap, fabric, grow bags, twine, ties, wire basket, etc.) from the upper twelve inches or 2/3 of the root ball, whichever is greater AFTER the tree is set in place. Removing these materials outside of the planting hole and then moving the tree into the hole may cause the root ball to shatter. The materials left in the planting hole are not a concern since roots grow outward, not downward.
Actual planting techniques in this step will vary. Generic steps include:
- Remove any extra root ball wrappings added for convenience in shipping and marketing (like shrink-wrap, ties, or a container). However, do NOT remove the burlap, wire basket, and twine that hold the root ball together until the tree is set in place and in the hole.
- Set the tree in place in the planting hole. Remember that the inside curve of any graft crook faces north.
- Check the depth of the root ball in the planting hole and ensure the top of the root ball sits one to two inches above the soil grade. If incorrect, remove the tree and correct the planting hole depth, firming any soil added back to the hole.
- Align the tree vertically and check it from several angles to ensure the trunk is straight. If the tree is crooked, add soil under the root ball.
- Remove all the wrapping (burlap, fabric, twine, wire basket, etc.) on the upper twelve inches or upper 2/3 of the root ball, whichever is greater.
- For stability, firm a shallow ring of soil around the bottom of the root ball. This is done to eliminate the need to stake in many situations. [Figure 14]
- If circling roots are found in the root ball, shave off the outer 1-1½ inches of the root ball with a pruning saw and/or pruners. You can also remove these roots with a pair of pruners if the roots are larger.

Leaving burlap, twine, and wire baskets on the sides of the root ball are not acceptable planting techniques.
Labor Saving Techniques
A labor-saving technique is to dig the hole twice the root ball width with more vertical sides. Place the tree in the hole at the correct depth, firm a ring of soil around the base of the root ball to stabilize it, remove wrappings, and correct for circling roots. Then with a shovel cut the sides of the planting hole to form the saucer-shaped planting hole three times the root ball diameter. With this technique, part of the backfill soil does not have to be removed and shoveled back but falls back into the hole. Soil “peds” (dirt clods) up to fist size are acceptable. With this technique, it is not practical to mix in soil amendments, as amendments must be thoroughly mixed throughout the backfill soil. [Figure 15]
When setting the tree in the planting hole, if the tree has a “dogleg” (a slight curve in the trunk just above the graft) the inside curve must face north to reduce winter bark injury.

Step 4. Underground Stabilization (if Needed)
One option in tree planting is to use underground stabilization of the root ball rather than above-ground staking. Underground stabilization is out of the way and will not damage the trunk’s bark.
Staking became a routine procedure when trees were planted in deep holes and the trees sank and tilted as the soil settled. It is also commonly done in public areas. In The Practical Science of Planting Trees (Gary W. Watson and E.B. Himelick, International Society of Arboriculture), where trees are set on undisturbed soil and a ring of soil is firmed around the base before backfilling, staking or underground stabilization is not needed in most landscape settings.
Step 5. Backfill
During the backfill process, the best method is to simply return the soil that was removed during digging the hole and let water settle it.
Avoid compacting the soil by walking or stomping on it. If the planting hole is narrow or was created using an auger, the planting hole can be widened into the desired saucer shape in this step.
Backfill should not be placed on the top of the root ball. The backfill soil should cover the root ball “knees” tapering down to the original soil grade.
In preparing any garden for planting, it is a standard procedure to modify the soil structure (i.e., loosen the soil) by cultivating. It is also routine to amend the soil by adding organic matter to improve the water-holding capacity of sandy soils or to increase pore space in clayey soils. Modifying and amending, while related, are not the same process.
Modifying the Backfill
When planting trees, the soil in the planting hole is modified (loosened up) by digging the hole and removing the soil. Creating a saucer-shaped planting hole three times the diameter of the root ball supports rapid root growth and reduces post-planting stress.
When backfilling, soil “peds” (dirt clods) up to fist-size are acceptable. The soil does not need to be pulverized. In clayey soils, pulverizing the soil can destroy structure and may lead to compaction.
A labor-saving technique is to dig the planting hole two times root ball diameter with more vertical walls. Then in the backfill step, cut the hole to three times as wide as the root ball into a saucer-shaped hole. In this method, part of the soil does not have to be moved twice. Peds (dirt clods) up to fist size are acceptable in the backfill. [Figure 16]

Amending the Backfill
Amending the soil in the planting hole is a complex issue and has been researched extensively. In tree planting, it is a common procedure to amend backfill soil with organic matter, such as compost.
Amending the backfill soil to be five percent organic matter by volume is acceptable and may be supportive to root growth in the planting hole during the first two years.
However, amending the backfill to twenty-five to fifty percent organic matter by volume is a common mistake. This approach helps containerize the roots and may also hinder root spread beyond the planting hole. Heavily amended soils may hold excessive amounts of water, reducing soil oxygen levels. Further, as the organic matter decomposes, the total volume of soil in the planting hole diminishes.
When amending the soil, the organic matter needs to be thoroughly mixed with the backfill soil. Never backfill with organic matter in layers or clumps as this creates additional texture interface lines. Amendments should be composted. Never use unfinished compost or fresh manure.
Texture Interface
Changes in porosity create an interface that impedes water and air movement across the texture changes. There will always be a texture interface between the root ball soil and backfill soil and between the backfill soil and undisturbed site soil. Amending the backfill soil will not reduce the interface.
To deal with the texture interface, it is imperative that the root ball comes to the soil surface with no backfill soil over the top of the root ball. If backfill soil covers the root ball soil, the interface between the root ball and backfill soil will impede water and air movement into the root ball.
Summary: Modifying and Amending
For rapid root establishment and eliminating post-planting stress, the focus needs to be on creating a planting hole with the correct width and depth. In most situations, amending or not amending the backfill has little significance compared to other planting protocols.
Step 6. Staking (If Needed)
Staking tends to be a routine procedure. In The Practical Science of Planting Trees, when trees are set on undisturbed soil and a ring of soil is firmed around the base before backfilling, staking is not needed in most landscape settings.
In areas with extreme winds, “anchor staking” may be needed for improved wind resilience. In some landscapes, new trees may need “protection staking” to protect trees from human activities (like the soccer game on the lawn).
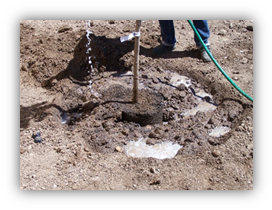
Step 7. Watering to Settle the Soil
Watering is done after planting and staking so the gardener does not compact the wet soil by walking on the area. Watering settles the soil without overly packing it. It may take several applications of water to thoroughly soak the backfill. [Figure 17]
Step 8. Final Grade
In the wide, shallow planting hole, the backfill soil is likely to settle during watering. Final grading may be needed after watering. [Figure 18]

Step 9. Mulching
A mulch ring of arborist wood chips is suggested around all trees to help protect the trunks from lawnmower and string trimmer damage. On newly planted trees, organic mulch can increase fine root development by 400% and result in 20% faster canopy growth compared to grass under the tree. The increase in growth is due to the lack of competition from vegetation (grass/weeds).
Site-specific water needs should be considered regarding the use of mulch. Mulch over the rooting area helps conserve moisture, moderate soil temperatures, and helps prevent weeds. Wood/bark chips may also blow away and may not be suitable for open, windy areas. Also consider the location of the trees and practice fire-wise landscaping techniques.
With newly planted trees, do NOT place mulch on top of the root ball. Mulch the backfill area and beyond. Avoid piling mulch against the trunk. [Figure 19] Use several inches of arborist chips (four to five inches) to provide the best benefits.

Planting Bare Root Trees
Bare root nursery stock is sold without an established soil ball and is usually limited to smaller-caliper materials. They are generally only available in early spring, prior to the plants leafing out. Some evergreen materials will not transplant well as bare-root stock.
The cost for bare root stock can be significantly lower. Survivability drops rapidly once the plant leafs out. Some nurseries keep bare root nursery stock in cold storage to delay leafing.
Bare root plants dehydrate rapidly, and the roots must be protected. Bare root stock is often sold as individual plants with the roots bagged in moist sawdust or peat moss to prevent dehydration. Sometimes bare root stock is temporarily potted to protect roots.
Techniques To Plant Bare Root Nursery Stock
Bare root trees are planted with the same basic steps as container-grown or B&B stock, with the modification that the roots are spread out on a mound of soil in a horizontal plane in the planting hole. It is critical to minimize exposure of the roots as feeder roots dehydrate in minutes. Generic steps include the following:
- Unpack roots to measure horizontal root spread. Cover or repack to protect roots while the hole is dug. Consider re-hydrating roots in a bucket of water for a couple of hours. Do not let them soak for more than half a day.
- Dig a shallow, saucer-shaped planting hole three times the diameter of the root spread. The depth of the planting hole should accommodate the planting depth standards mentioned previously.
- Create a mound of soil at the base of the planting hole. The height of the mound would be based on the root structure of the tree and where the first structural roots are located. Generally, at least two structural roots should be within the top one to two inches of the soil surface. The mound height will take some trial and error.
- On species prone to trunk circling roots (such as crabapples, hackberry, linden, poplar, and maple), the structural roots should be within the top one inch of the root-ball soil surface.
- Gently spread the roots out on top of the mound on a straight, horizontal plane.
- As backfill is added, gently tamp the soil around the roots and gently pull up on the tree to help fill in the air pockets around the roots. Do not stomp the soil with your feet but press on the soil to help secure the tree in place.
- Many bare-root trees will need staking.
- Water the newly planted tree.
- Create the final grade.
- Apply arborist chips/ wood mulch, as described above.
This publication, reference GardenNotes #633, is developed as part of the Colorado State University Extension Master Gardener Program.