Staking has been a routine step in the tree planting process. In CMG GardenNotes #633, The Science of Planting Trees, where trees are set on undisturbed soil and a ring of soil is firmed around the base before backfilling, staking is not needed in many landscape settings. Staking straps can cause serious injury to trees if improperly attached or left on the tree for too long.
Consequences of Staking
The consequences of staking, using methods that prevent the tree from shifting in the planting hole, include the following:
- The tree grows taller and faster.
- Staking the tree tightly, preventing the lack of movement, can slow root spread.
- Caliper development may be uneven, resulting in the wider caliper development above the staking strap. This is called “reverse trunk taper.”
- Staked trees experience more wind damage than un-staked trees of equal height (the top of the tree is not free to bend in the wind).
- Bark is often damaged by the ties.
- If the stake is close to the trunk, it can cause the tree to lean to the side. Keep stakes at least six inches away from the trunk.
Purposes of Staking
No Staking – In most home landscape settings, staking is not necessary if the tree is set on undisturbed soil (where it cannot sink and tilt), with soil firmed around the base of the root ball, which stabilizes the root ball, before backfilling. Exceptions include the three types of staking below.
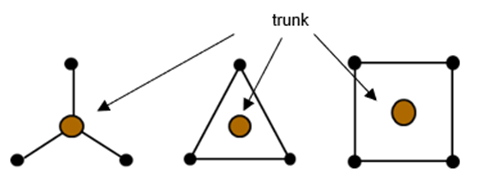
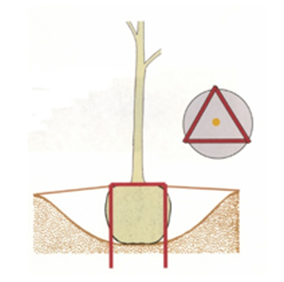
Protection Staking – This is used where the tree needs protection from human activities.
Protection staking may include standard staking techniques with three or four posts and straps or a structure surrounding the tree but not actually touching the tree trunk. [Figure 1]
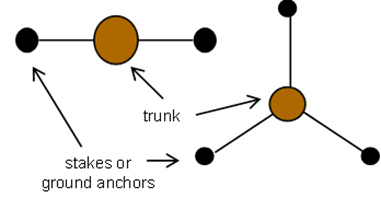
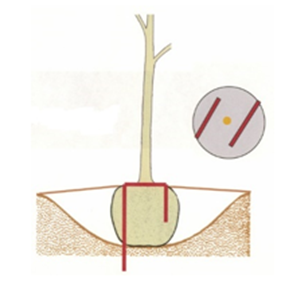
Anchor Staking – In areas of high, consistent winds, anchor staking may be needed. When anchor staking small trees, use two or three straps along the trunk about eighteen inches above the ground. [Figure 2]
Support Staking – If the tree has a floppy trunk that is not self-supporting, support staking will be needed. Straps would be located six inches above the point where the tree will stand upright, but at least three feet below the terminal leader. Buying trees that are not held to nursery standards is not encouraged – think twice before purchasing trees that cannot support themselves without support staking.
Above Ground Staking Procedures
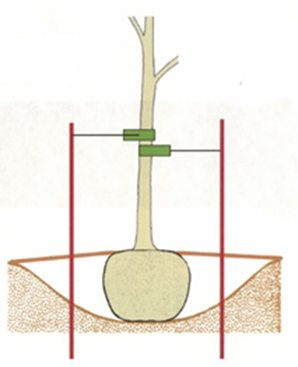
When staking, use flat, grommeted straps [Figure 3] rather than ropes, wires, or hose segments against the trunk. The straps spread the pressure over a wider area, reducing the potential for bark damage. Straps should lie flat against the trunk and should not be bunched up or twisted. Each staking post would have one staking strap. A total of two to three posts and staking straps are routinely used.
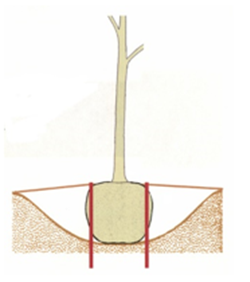
Straps may be attached to wood or metal posts or to anchors in the ground. Plastic caps are available as a safety measure for the tops of metal posts. Place posts at least fifteen to eighteen inches out from the trunk. Never attach a post to the trunk, as it can cause the trunk to curve. Flag the guy-lines to help people see them and prevent injury. [Figure 4]

In any staking system, it is best if the tree trunk has a little flexibility and the ability to move in the wind. Movement will encourage root growth and trunk caliper development.
Because staking straps can cause damage to tree trunks, remove them after one growing season. You can determine if the tree has rooted by gently pushing on the trunk and observing the root ball for any movement below the ground. In some cases, a spring-planted tree may be established by the fall and the staking straps can be removed. Staking straps left on trees can cause significant long-term damage and affect overall growth and health.
Underground Stabilization Methods
Several methods for underground stabilization are effective. They are applied prior to backfilling the planting hole.
Two or three wood dowels driven into the ground at the edge of the root ball. The dowels will slowly decompose over time. [Figure 5]
A 2×2 wood triangle over the top of the root ball is screwed into 2×2 wood stakes driven into the ground at the edge of the root ball. The wood will decompose over time. [Figure 6]
Two metal root “staples.” Several brands are on the market. The long leg of the staple goes into the ground at the edge of the root ball. The short leg of the staple goes into the root ball. The metal staple may pose a problem if the tree stump needs to be ground out in the future. [Figure 7]
This publication, reference GardenNotes #634, is developed as part of the Colorado State University Extension Master Gardener Program.