Principles of Water-Wise Landscaping
Planning and designing for water conservation, beauty, and utility. Beautiful, water saving gardens are not accidents. The most effective garden plans are comprehensive, include plant types and placement, intended use of the space, and maintenance.
Hydrozoning. Different plants have different water requirements. Design gardens with climate-appropriate plants, grouped according to their water needs. Equally important is maintaining these hydrozones by watering based on actual need, rather than simply ‘setting and forgetting’ an irrigation clock to water the entire yard evenly.
Watering efficiently with appropriate irrigation methods. Achieving irrigation efficiency requires an integrated approach that combines sound system design, routine maintenance, and strategic water management.
Creating practical turf and non-turf areas. Water-wise landscaping is not necessarily anti-turf, but rather matches the landscape design to the actual use of the site. This is a change from the typical landscape design where a little-used but high input lawn is the predominant feature.
Improving the soil. Soil improvement will be site specific and depends on the intended landscape type.
Mulching to reduce evaporation. Mulch reduces evaporation greatly compared to bare soil. Apply mulch to a depth of 3-4 inches.
Maintaining with good horticultural practices. Healthy plants are more tolerant of extreme conditions, including drought.
What Is Landscape Design?
Landscape design is a process, rather than just plunking down plants. For existing landscapes, let the design process guide the gradual evolution of the yard or garden to become more water wise.
Landscape design exists to create practical and pleasing outdoor living space, bringing the user’s wants, needs, and values into the landscape. These will vary among people and families and will likely change.
Good landscape design recognizes the gardener’s investment in time and dollars to install and maintain.
Landscape design is about how the space will be used. It is about the connections and “feelings” created with the space. Is the space for relaxation and healing, or for action? For many, gardening is a vehicle for spiritual and emotional connection and renewal. Consider:
“More than anything else, a garden is a portal, a passage into another world, one of your own thoughts and your own making; it is whatever you want it to be.” (William Longgood.)
Paradise is from the ancient Greek word for an enclosed park, orchard, or pleasure garden. (Oxford English Dictionary.)
Landscape design and gardening are not the same. Being a good gardener does not make the individual a good designer, and good designers are not always good gardeners. But they are related. The best designers combine the art of designing with deep understanding of how plants grow.
Steps to Creating Water-Wise, Practical, and Pleasing Outdoor Living Space
- Site analysis identifies opportunities and limitations of the property.
- End-user analysis identifies landscape goals. Once landscape limitations and goals are identified, the design drawing begins. Design considerations should include line (how the eye is encouraged to move through a space), scale, balance, color, and texture.
- Delineate planted and hardscape areas, creating outdoor rooms.
- Define use of space using hydrozones.
- Bubble drawings define hydrozones for efficient landscape irrigation.
- Create practical turf and non-turf areas.
- Refine spaces (lawn areas, flowerbeds, vegetable garden, patio, etc.) using a unified design style. Remember to keep design elements in scale with one another and neighboring structures and imagine being in the space.
- Refine preliminary design for efficient irrigation.
- Define use of space using hydrozones.
- Develop plant consideration lists based on hydrozones.
Step 1. Site Analysis Identifies Opportunities and Limitations of the Property
Landscape maintenance professionals estimate that 90% of landscape maintenance problems arise from issues that could or should have been addressed with the site analysis. For most gardeners, site analysis is an ongoing process. Keep a garden journal, recording concerns and success for future reference. Use the questions below to guide a thorough site analysis.
Soil Tilth
- What is the soil texture (sandy, loamy, clayey)?
- How deep is the soil? Is it compacted?
- What is the soil pH, and does it contain free lime?
- What percentage of organic matter is in the soil?
- How are nutrient levels? Is the soil high in salts?
Grading and Drainage
- How quickly does water drain down through the soil profile?
- Does water drain off the property? Can the water be slowed, spread, or encouraged to infiltrate the soil? (Colorado law prohibits stopping the water, e.g., with a pond).
- Does water drain onto the property?
- Are portions of the property at risk for erosion?
- Are grading structures such as berms in use or needed?
- Are there any low spots or standing water?
- Do any slopes correspond to land use? Slopes greater than 10% are hard to walk on and require year-round plant cover to prevent erosion.
Acceptable Slope
- Drainage swales, 2% to 10%.
- Driveways, 1% to 15%.
- Entrance walks, 1% to 4%.
- Patio-terrace, 1% to 2%.
- Planted banks, up to 33% with year-round plant cover to prevent erosion.
- Ramps (with railing), up to 15%.
- Steps (with railing), up to 50%.
Grading Structures
- Berms and retaining walls can be used to modify slopes and affect drainage.
- For stability, retaining walls and dry walls have specific design criteria. Contact the local building department for details on applicable local code requirements.
Microclimates
- What is the garden aspect (e.g., north or south-facing) and shade patterns?
- What are the prevailing winds and air drainage?
- Does the landscape exacerbate temperature extremes (heat sinks, cold pockets)?
Existing Plant Materials
- What plants are currently in the landscape?
- What is their condition?
- Which will be kept?
The Extended Landscape
- Do any municipal codes or subdivision covenants apply?
- Do any views need to be framed or hidden?
- Can the landscape mitigate traffic noise or other neighborhood noise?
- Should the planned landscaping match the neighborhood landscape style?
- Have privacy and security been considered?
Natural Precipitation and Irrigation Potential
- In Colorado, natural precipitation varies greatly, from below seven inches per year to above 35 inches per year. What is the natural precipitation at your site?
- Colorado communities vary greatly in water resources. What is the situation in your community? Is water available for irrigation? Are there irrigation restrictions?
Opportunity or Constraint?
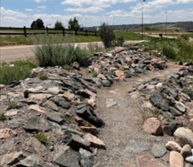
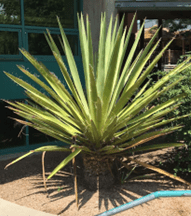
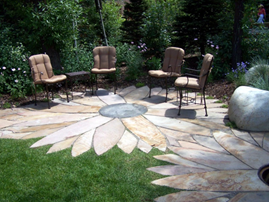
A thorough site analysis can help a gardener work with the conditions of the property to create a practical and pleasing landscape. Good design leverages growing conditions to create thriving gardens rather than forcing an inappropriate design into a limiting site. [Figures 1, 2, and 3]

Step 2. End-User Analysis Defines Goals for the Landscape
What is the landscape for? How will people relate to it? Will the space be extensively used by families? By individuals? Is it a space that will be viewed but not occupied?
What does the end-user want to “feel” when interacting with the landscape? Is it a setting of peace and relaxation, or a setting for activity? These questions should be answered before embarking on any design. Also consider:
Landscape Values: What are the interests and values that should be incorporated into the design? Should the garden be irrigated or non-irrigated, planted only with native plants, be a haven for pollinators, historically and/or culturally relevant, etc.?
Time: How much time can be dedicated to gardening activities?
Dollars: What financial resources will be invested in the landscape?
Rather than haphazardly filling a landscape, consider how people will relate to the landscape and design accordingly. [Figures 4 and 5]

Step 3. Delineate Planted and Hardscape Areas, Creating Outdoor Rooms
Planted areas of the landscape include all the plants (trees, shrubs, flowers, turf, vegetables, fruits, etc.). Hardscapes comprise the non-living elements of the design (patios, decks, fences, water features, and lighting.)
Areas in the Landscape: Public, Private, and Utility
The public area, typically the front yard is openly viewed by others. Homeowners’ associations and cities often regulate what can and cannot be done in the public area of landscapes. When the public area reflects community landscape standards it builds a welcoming and friendly feeling for the community and enhances neighborhood property values.
The private area (usually the backyard) is not openly viewed by the public. Being private space, it is designed to support the end-user’s activities and interests, including:
- Cooking and eating spaces.
- Places to play and relax.
- Fruit, vegetable, and flower gardens.
- Water features or specialty gardens.
Utility areas serve specific functions such as storage and parking. Their function needs to be considered and incorporated into the landscape design.
- Garden shed, potting area, work area, compost, and trash bins.
- Storage, dog runs, additional parking for cars, boats, RVs.
Design Can Be Thought of As Creating Outdoor Rooms
- What makes up the floor?
- What makes up the wall?
- What makes up the ceiling?
- Lines connect and define spaces (rooms).
Step 3a. Define Use of Space by Hydrozone
Bubble Drawings
Bubble drawings help define the large scale use (macro) of space. Bubble drawings help define identity, space allocation, and use. For example, a circle represents the location and approximate size of the patio. Other shapes identify the location and approximate size of lawn areas, the vegetable garden, flower beds, etc. [Figure 6]
Bubble drawings do not identify actual lines, beds, path, or individual plants. These will come in future steps in the design process.
The bubble drawing step also defines hydrozones, which are areas with various levels of irrigation.
Existing landscape elements that will not change (like an existing deck or large tree) should be on the plan before starting this step.
Do not move on too fast. Try lots of options before selecting the one to use as the basis for the design, and don’t forget to inform your choices with the information gained in the site analysis.
Hydrozoning
Irrigation is applied to areas, not plant by plant. Even with a drip system, several plants are grouped on the same zone and receive water at the same rate. Hydrozoning groups plants with similar water needs. The gardener must irrigate each zone in the landscape to match the water needs.
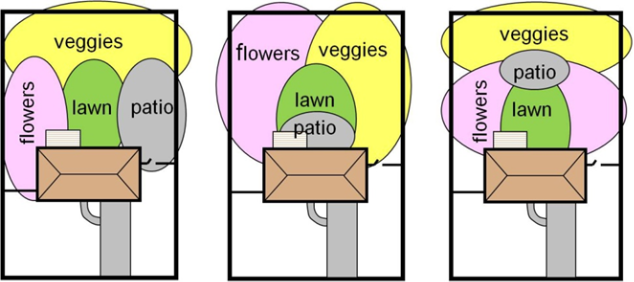
When developing bubble drawings, factor in the irrigation needs (hydrozones). [Figures 7 and 8]
- Areas of routine irrigation – watered every two to four days.
- Areas of reduced irrigation – watered every four to fourteen days.
- Areas of limited irrigation – watered during dry spells once plants are established.
- Non-irrigated areas.
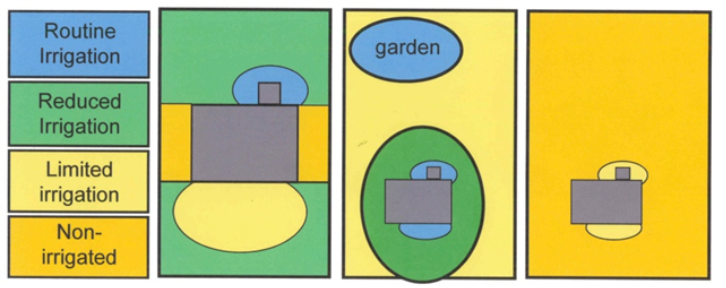
Left: Yard with reduced irrigated lawn in front and back, limited irrigation shrub and flower bed in front yard, routine irrigation flower bed around patio in back yard and non-irrigated side yards.
Center: Larger property with a patch of lawn in the front and back yard while much of the property has limited irrigation. Note that the high-water use garden would be better placed near the back door with the other high-water use plants.
Right: Yard is basically non irrigated with small, limited irrigation flowerbeds near house in front and back.
Practical Turf
If recreation or gathering space is important for the final landscape, turf may be an appropriate choice. What turf type matches the landscape objectives for the site?
- For high traffic areas with lots of wear and tear, like ball fields or yards used by children to play or for pets, Kentucky bluegrass and turf-type tall fescue with regular irrigation are appropriate. While most home lawns are managed this way, few actually have the wear and tear to justify routine irrigation.
- Kentucky bluegrass and turf-type tall fescue are good choices for most backyard play and gathering areas. However, these spaces typically need less water and maintenance than public or heavily used lawns. Bermudagrass is a drought-tolerant option for lower elevations.
- Summer dormant Kentucky bluegrass or buffalograss can be used in lower-traffic areas.
- Non-irrigated sites with low foot traffic may be appropriate for buffalograss or blue grama grass. The appearance of the lawn depends on the amount of rain the grass actually receives.
What turf type matches the community’s water supply?
Some communities lack the water resources for routine landscape irrigation. In some locations in Colorado, limited irrigation or completely unwatered landscapes may be the only practical options.
Step 3b. Refine Spaces Using a Unified Design Style
Using your bubble drawing, begin to define spaces, using a single design style in order to maintain garden coherence. For example:
- Rectilinear style has straight lines and right angles in square and rectangular shapes.
- Curvilinear style avoids straight lines and right angles using bold sweeping curves instead.
- Angular style uses straight lines but with a variety of angles and directions.
The property line and the home style do not dictate the landscape style but can help inform it. Use features on the home as size references to keep garden elements in scale.
Step 3c. Refine Preliminary Design for Efficient Irrigation
Efficiency in irrigation is based on uniformity of water delivery. If water is delivered unevenly in irrigation zones, some spots will be overwatered to keep the spots that receive less water green.
Sprinkler Irrigation: Design Criteria for Uniform Water Delivery
Uniformity of water delivery equals water savings.
- Head-to-Head Coverage
- Spray from each head must reach neighboring heads.
- Less than head-to-head coverage (while popular to reduce installation costs) significantly increases water use for the life of the system.
- Water From the Edge Inward
- Another standard for water savings is to water from the outside in.
- Edges cannot be efficiently watered from the center; the edge will be dry, and water will be wasted spraying into non-irrigated areas.
- Although lining irrigation zone edges with sprinkler heads requires more sprinkler heads which increases installation costs, it is a primary water saving technique.
- Fill in with heads in square and triangle patterns.
- For uniform water distribution, fill in heads in square or triangle patterns. The overlap gives the most uniform delivery and avoids dry spots.
- Adding an extra head to ensure coverage is preferable to rigorously following a geometric pattern.
- Use uniform type, brand, and style of heads in each irrigation zone.
- Different heads and nozzles have different precipitation rates so keeping them the same within zones keeps water application even.
- Avoid sprinkler irrigation of small or irregularly shaped areas.
- In design, avoid creating small (less than about eight feet wide), irregularly shaped areas that will require irrigation. If such areas are unavoidable, design them for drip irrigation or hand-watering.
- Use recommended water pressure.
- A mist cloud around a sprinkler head indicates excessive pressure, increasing evaporation, and total water usage.
- A pressure regulator is standard on drip systems. They can be retrofitted into the water line in older systems being converted from spray heads to drip.
- Most sprinkler heads in the home garden trade are designed to work at 30 to 40 psi, and generally do not have internal pressure regulators.
- Heads used on commercial/industrial properties may work with much higher pressures and these more expensive heads generally have a pressure regulator built into the head.
- Many cities deliver water at 30 to 40 psi. However much higher pressures are possible. With pressure above 80 psi, automatic valves may have trouble closing.
Typical Sprinkler Patterns [Figure 8]
- Full circles.
- Half circles giving a straight line.
- Quarter circles give a right angle for square corners.
- Adjustable arc (the angle can be manually set); however, these are less uniform in delivery.
- Other patterns (like strip head) lack good uniformity in water distribution.

Fitting Sprinkler Patterns Into the Design
Spray heads are usually spaced at eight to fifteen-foot intervals depending on the nozzle. They have a high water delivery rate, up to two inches per hour, often leading to surface run-off.
Rotor heads are spaced at fifteen to forty-five or more foot intervals (depending on the nozzle and head type). They have a lower delivery rate, between 1/4 – 1/2 inch per hour.
A thirty foot by forty-five foot lawn area could have pop-up spray heads at fifteen foot intervals, with quarter heads in the corners, half heads along the sides and full circles in the center. [Figure 9]
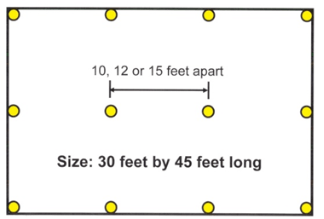

Figure 9.
Left: For this 30 foot wide by 45 foot long area, pop-up spray heads could be used at 15 foot centers.
Right: quarter heads would be place in the corners, half heads along the sides and full circle heads in the center. With head-to-head coverage, this would give a good efficiency for water delivery.
If a flowerbed were to be added to the area, blocked spray would create a dry area around the bed and a very wet planting bed from the intercepted water. In water-wise design, avoid blocking sprinkler delivery with flowers and shrubs.
In water-wise landscaping design, irrigation design must be considered. If modifying an existing landscape, overlay the sprinkler layout onto the design. Then adjust the lines of the design, irrigation lines or bed lines, for an efficient irrigation layout of each hydrozone.
Remember:
- Head-to-head coverage.
- Water from the zone edge inwards.
- Place heads in square and triangle patterns.
Step 4. Develop Plant Consideration Lists
Plant materials need to be identified by water needs so they can be grouped into hydrozones. Flexibility in the design process at this point allows for the consideration of exciting new plants, not previously known or grown. Flexibility will also be needed when the desired plants are not available or are of poor quality.
Water-Wise Landscaping in Colorado’s Semi-Arid Climate
Beautiful gardens do not require irrigation beyond the establishment phase. Neither does irrigation guarantee a beautiful garden. Carefully choosing site-adapted plants based on the site analysis will maximize water savings and aesthetics.
Even xeric plants need rain and/or irrigation during establishment. Gardens with limited or no irrigation are more closely linked to the weather, thriving in years with heavy rainfall and remaining more modest in dry years.
CMG GardenNotes on Water-Wise Landscape Design
- #410, Water-Wise Landscape Design: References and Review Material.
- #411, Water-Wise Landscape Design: Steps.
- #412, Water-Wise Landscape Design: Selecting Turf Options.
- #413, Water-Wise Landscape Design: Principles of Landscape Design.
This publication, reference GardenNotes #411, is developed as part of the Colorado State University Extension Master Gardener Program.