Introduction
Between 40% and 50% of annual domestic water use in Colorado (about 318 billion gallons a year) is used to water landscaping. According to Colorado Water Center, outdoor residential use in the state is nearly double outdoor park and commercial use—individual gardeners in the state, working together, can make a substantial difference in water supplies! According to the US EPA, as much as half of residential outdoor water is wasted through evaporation or runoff due to poor irrigation design, installation, operation, and maintenance.
Irrigation Zones Reflect Water Need
Irrigation zones are not always aligned with plant water needs. Irrigation zones may be installed poorly planned, or a landscape might change over time so that it no longer aligns with the originally intended watering patterns. A foundational step of irrigation efficiency is to be sure that the plants watered by any particular zone have similar water needs. For example, a lawn zone should water only lawn, not lawn plus flower beds, trees, or vegetable gardens, etc.
Because exposure to sun, heat, and wind play a significant role in water requirements, irrigation zones should also reflect exposure to these elements. For example, lawn on an open, windy, southwest-facing slope will have higher water requirements than the average lawn. Design this slope as an independent irrigation zone.
Areas in full or partial shade from a fence or building may have up to 50% lower irrigation needs than areas in full sun. If the shady area is in the rooting zone of large trees, water use will be similar to full sun, or even higher (the tree pulling water from the soil is not in the shade). Irrigation zones should reflect site needs.
Drip irrigation: Flower and shrub beds, small fruit gardens, and vegetable gardens can reduce water usage by 50% when coupled with organic mulch. For details on drip irrigation, refer to CMG GardenNotes #263, Understanding Irrigation Management Factors.
Sprinkler Design Criteria for Uniform Water Distribution
Unfortunately, in the design of many home and commercial sprinkler systems, little attention is given to design criteria for water conservation.
Sprinklers do not deliver a uniform quantity of water over their distribution area; areas close to the irrigation head receive more precipitation than those farther away. If irrigation systems are not designed to account for this unevenness, land managers are likely to overwater much of the lawn in order to keep the drier spots green. Designing sprinkler layouts to provide a more uniform water delivery can reduce water use by 25% to 50%. Most home lawn sprinkler systems have a 30% to 40% efficiency rating, whereas a 70% to 80% rating is achievable with attention to design and management.
Sprinkler design criteria for uniform water distribution includes the following:
Head-to-head coverage. In most residential and small commercial irrigation systems, irrigation heads should never be placed more than the distance of their throw radius, or half of the throw diameter, apart. Under no circumstance should heads be placed more than 60% of the throw diameter apart. For example, if the radius of a pop-up spray head is fifteen feet, the ideal spacing would be fifteen feet.
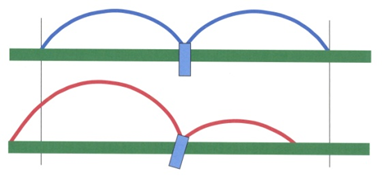
Even if sprinkler heads apply water evenly, the areas farther from the head receive less water because they are larger. [Figure 1] If the sprinkler head is in the center of circle “A”, circle “E” would receive about half as much water than “C”, and nine times less than spots closest to the head (Irrigation Association).
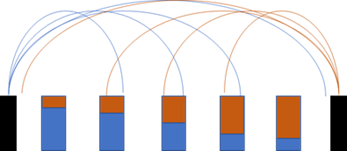
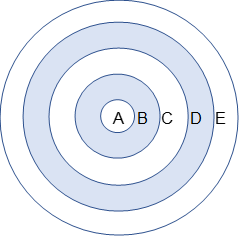
Figure 1. Because areas far from an irrigation head receive less water than those closer, head-to-head coverage ensures even water application. The two heads below, working together, apply water evenly in the area between them (water from the sprinkler on the left appears blue, from the right, orange).
Watering from the edge. Sprinklers should be lining out the edges of the zones (i.e., run a line of sprinkler heads down the edge of the lawn or irrigated area), spraying onto the lawn but not onto the sidewalk, street, or non-irrigated area. [Figure 2]
In sprinkler design, avoid layouts where sprinkler heads spray from the center of the lawn area out onto the sidewalk. It either wastes water as it sprays onto the sidewalk or creates a dry lawn area along the edge.
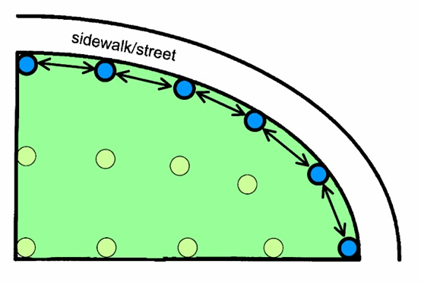
Arrange heads in square or triangular patterns. In the next step of the irrigation design process, fill in larger areas with sprinkler heads in regular square or triangular patterns. Spacing at no more than half of the throw diameter should take precedence over regular patterning. [Figure 3]
Avoid irrigating small, irregularly shaped areas. It is impractical to irrigate small lawns (less than eight feet wide) and irregularly shaped patches of turf without applying water where it is not needed. In small or irregularly shaped areas, consider replacing lawns with plantings that can be watered with drip irrigation, or consider non-irrigated options. For example, in the narrow side yards around urban homes, a ground cover requiring low water, or a non-irrigated mulch area are water-efficient options.
Use recommended water pressure. Water distribution patterns change with pressure. Use the pressure recommended for the specific sprinkler head in use. Most sprinklers in the home garden trade are designed to operate at 30 to 40 psi. Commercial heads typically operate at 40 to 100 psi, and some heads have built-in pressure regulators.
Sprinkler Maintenance Checklist for Uniform Water Distribution
We have all noticed that blown sprinkler head down the street that goes unfixed for weeks. A problem with automatic sprinkler systems is that the gardener may not be aware of a system malfunction. Check the irrigation system’s operations frequently.
As water-wise gardening concepts spread in our community, we need to adapt the practice of alerting neighbors to popped sprinkler heads and other system malfunctions. With an automated sprinkler system, many residents or landscape managers may be unaware of the mechanical failure.
Regular sprinkler maintenance issues for uniform water distribution includes the following:
Arc adjustment. Sprinkler heads, particularly rotor-type heads, frequently require adjustment of delivery angle to keep water on the irrigated areas and off non-irrigated areas.
Adjust radius of throw. As discussed in design, water from one sprinkler head needs to reach adjacent heads for uniform delivery. Occasional adjustment on the radius of throw may be needed. This is done with a screw adjustment on the nozzle or changing out the nozzle to one with a different radius.
Adjust sprinkler heads vertically. Distribution patterns change when the head tilts off vertical alignment. To correct it, remove a donut shape of sod around the head with a shovel. Carefully loosen the soil around the head. Realign the head to vertical, and then firmly pack soil around the base of the head before replacing the sod. [Figure 4]
Adjust head height. When water flow does not clear the grass height, the distribution pattern can be distorted. Raise heads to release water above grass height. On the other hand, sprinkler heads set excessively high can be a trip hazard and can interfere with mowing. [Figure 5]
To correct this, remove a donut shape of sod around the head with a shovel. Carefully loosen the soil around the head. Adjust head to the correct height, and then firmly pack soil around the base of the head before replacing the sod.
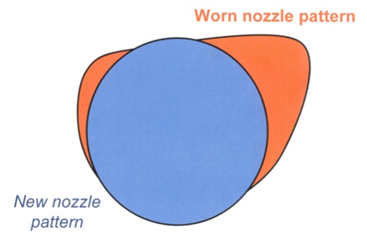
Replace worn nozzles: As sprinkler nozzles wear, distribution patterns change, giving a less uniform water delivery. Periodically replace old, worn nozzles. [Figure 6]
Adjust pressure. A mist cloud around the sprinkler head indicates that the water pressure is too high for the head. Reduce pressure to avoid wasting water. A pressure regulator can be added to the main supply line. When adjusting pressure, slowly drop the pressure until you see water flow just start to drop, then up the pressure just a touch.
Replace leaky valves. In an irrigation valve, the rubber diaphragm that turns water on and off ages over time. Valves that do not shut off completely need the diaphragm or entire valve replaced. Valves often fail to shut off if the pressure is above 80 psi.
Sprinkler Management Criteria for Water-Wise Irrigation
Sprinkler management addresses two primary questions: how much to water and how often to water? Irrigation scheduling is discussed in more detail in CMG GardenNotes #265, Methods to Schedule Home Lawn Irrigation.
Know the precipitation rate for each irrigation zone and adjust run time to match water needs of each zone. The first step in irrigation management is to calculate the precipitation rate for each zone. Once the precipitation rate is known, the controller can be set to deliver the desired amount of water. Because distribution patterns and precipitation rates vary from zone to zone, run times should be set for each irrigation zone based on precipitation rates.
Most irrigation controllers are set with all zones receiving the same run time. This results in zones that need less water being overwatered.
Adjust irrigation controller for the season. As summer temperatures increase, water use goes up; as cooler fall weather moves in, water use goes down. Unfortunately, most gardeners have their controllers set for the summer and never adjust the controllers for the season. Without seasonal adjustment, lawns and gardens are overwatered in the spring and fall. Iron chlorosis is a common symptom of springtime overwatering. Several methods can be used for irrigation scheduling. For details, refer to CMG GardenNotes #265, Methods to Schedule Home Lawn Irrigation.
Water bluegrass at 80% evapotranspiration. When water is available, Kentucky bluegrass uses significantly more water than what it needs to remain green. Bluegrass also slows its water use and growth rate as soil moisture decreases. Watered at 80% ET, a home bluegrass lawn will remain thick and green. Watered at 60% ET, a home bluegrass lawn will remain green, but may show signs of stress like thinning, and will tolerate less foot traffic.
Summer-dormant Kentucky bluegrass. Where appropriate for the use of the site, allowing Kentucky bluegrass to go dormant in summer is very water efficient. Summer-dormant bluegrass requires only about fourteen inches of rain and irrigation per year (applied in the spring and fall). For additional details, refer to CMG GardenNotes #412, Water-Wise Landscape Design: Selecting Turf Options.
Turn off sprinklers in rainy weather. Manually shutting off the sprinkler system during rainy weather is another effective management tool. An inexpensive investment (around $25) to help manage the irrigation system is a rain shut-off sensor. In many parts of the country local ordinances require rain shut-off sensors.
Use cycle-and-soak timing. On slopes and on compacted or clayey soils water can be applied much faster than it can infiltrate into the soil, leading to surface run-off. To deal with this, use multiple short-run cycles that allow the water to soak in between cycles. Most controllers readily accommodate this with multiple start times.
- On clayey soil with pop-up spray heads, apply about one quarter inch per cycle (about eight to ten minutes) with two or three cycles to apply one-half-inch to three-quarters, inch of water per irrigation. Runs are typically spaced an hour apart or, more commonly, after all the zones have run their cycles again.
Determine the reason for dry spots. The common approach for managing dry spots is to increase the amount of water applied. Although it may green up the dry spots, it also overwaters the rest of the lawn, wasting water.
To evaluate a dry spot, first place some identical, straight-sided, flat-bottomed cans (like soup, vegetable cans, or coffee mugs) out to measure the water applied. Compare the amount of water received in the dry spot to the amount of water received in green areas. If the dry spot receives significantly less water, it is a water delivery problem (like a malfunctioning head or design problem). If similar amounts of water are being received, the problem is soil or plant related (like compaction, thatch, and root damage).
- Note: As the gardener fine-tunes the management of their irrigation system, dry spots will show up in hot weather. This indicates that they are successfully walking the edge on ideal irrigation management, applying nearly exactly what the turf needs, not more.
Aeration. This is a primary tool to increase water infiltration. Aeration may be useful in the spring and fall on lawns with a lot of traffic (children and dogs), compacted, clayey soils, and slopes. For details refer to CMG GardenNotes #551 Basic Turf Management.
Water deeply and infrequently. This develops a deep root system that gives the plants more resilience in hot, dry weather.
Water at night or early morning hours. To reduce water loss from evaporation, water between 9:00 p.m. and 9:00 a.m. In many areas, wind drift is less in the early morning hours.
CMG GardenNotes on Irrigation Management
- #260, Irrigation Management: References and Study Questions.
- #261, Colorado’s Water Situation.
- #262, Water Movement Through the Landscape.
- #263, Understanding Irrigation Management Factors.
- #264, Irrigation Equipment.
- #265, Methods to Schedule Home Lawn Irrigation.
- #266, Converting Inches to Minutes.
- #267, Watering Efficiently.
- #268, Irrigation Management Worksheet: Lawn In-Ground Sprinkler System Check-Up.
This publication, reference GardenNotes #267, is developed as part of the Colorado State University Extension Master Gardener Program.