by M. Bunning, P. Kendall, and E. Shackleton*
Quick Facts…
- Do not use the open kettle method for canning fruits. Never can in an oven (electric, gas or microwave).
- Use jar size, processing methods, and time given in reliable, up-to-date canning instructions.
- Increase boiling water canner processing times at elevations above 1,000 feet to compensate for the lower temperature of boiling water at higher altitude.
- Check jars for seals within 24 hours of canning. Handle any unsealed jars as if a
‘fresh’ and perishable food product. Eat, refrigerate, or reprocess immediately for safety. - Use CSU Extension’s free Preserve Smart app/website for 24/7 access to tested home food preservation recipes and instructions for over 55 fruits and vegetables!
Preserving food at home can be a rewarding experience that provides year-round access to seasonal produce. With renewed interest in locally-grown foods, home gardening, and food preservation, it’s important to protect yourself and your family by knowing and following safe canning methods.
- Select fruits at optimal ripeness for best results (firm, nice color, aromatic, etc.).
- Avoid overripe or bruised fruit which may negatively impact flavor, texture and appearance of the final product.
- Fruits can be safely processed in a boiling water canner. Always use standard canning jars, new lids, and keep your canning equipment and supplies well-maintained.
- Use tested recipes and instructions, and be sure to make the necessary processing adjustments for the elevation where you live. Unsure of your elevation?
- Never take shortcuts in recommended preparation or processing procedures which can result in seal failure, spoilage, and an increased risk for foodborne illness.
Equipment and Jars
Water bath canners. Any large pan may be used as a boiling water canner if it is deep enough and has a tight-fitting cover and a rack. Some canners also come with rack dividers that help prevent jars from touching each other or falling against the side of the canner.
- Be sure the canner is at least 4 to 5 inches deeper than the height of jars used to allow adequate space for the rack and briskly boiling water.
- For pint jars, you need a container at least 10 inches deep.
- For quart jars, the container should be at least 12 inches deep.
A deep pressure canner may also be used as a boiling water canner. Cover but do not fasten the lid. Also, leave the petcock wide open so steam can escape and pressure does not build up inside the canner.
Canning jars. Standard mason jars are recommended for home canning.
- Be sure all jars are perfect. Discard any with cracks or chips which could result in breakage or prevent airtight seals.
- Before use, wash jars in hot soapy water and rinse well.
- Keep jars warm until ready to fill and place in canner.
NOTE: If needed, remove scale or hard water films on jars by soaking several hours in a solution of 1 cup vinegar (5 percent) per gallon water prior to washing.
Did You Know?
Commercial food jars (such as mayonnaise or pasta sauce) are not safe for home food canning.
- They are not heat tempered and can break easily during processing.
- Sealing also can be a problem if the jar’s sealing surface does not exactly fit the canning lids.
Lids and Screw Bands (two-piece set). Discard any screw bands with dents or rust, since defects can prevent an airtight seal.
- Prepare new/unused flat metal lids as directed by the manufacturer.
- Lids are designed for single-use, and should NOT be used for home canning more than once!
- Screw bands can be cleaned and used multiple times. Store carefully to prevent rusting or denting.
NOTE: One-piece home canning lids have not been researched for safe home food preservation, and are therefore not recommended.
Other Useful Canning Tools:
- Air bubble remover, plastic knife, or non-metallic spatula- used to release air bubbles from within the jar
- Canning funnel- funnel made from metal or food-grade plastic with wide, short neck for filling jars
- Headspace ruler- special graduated utensil or plastic ruler for measuring required space at the top of a filled jar
- Jar lifter- used to safely move jars to and from hot water during the canning process
- Magnetic lid wand- helps transfer metal lids to top of jars to prevent contamination
- Timer- necessary for critical timed steps throughout the canning process
 https://apps.chhs.colostate.edu/preservesmart/
Prepare Fruit
- Select fresh, firm fruits for canning. The sooner from harvest to jar, the better.
- Wash all fruits thoroughly. Handle gently to avoid bruising.
- Avoid soaking fruits as it may cause loss of flavor and nutrients.
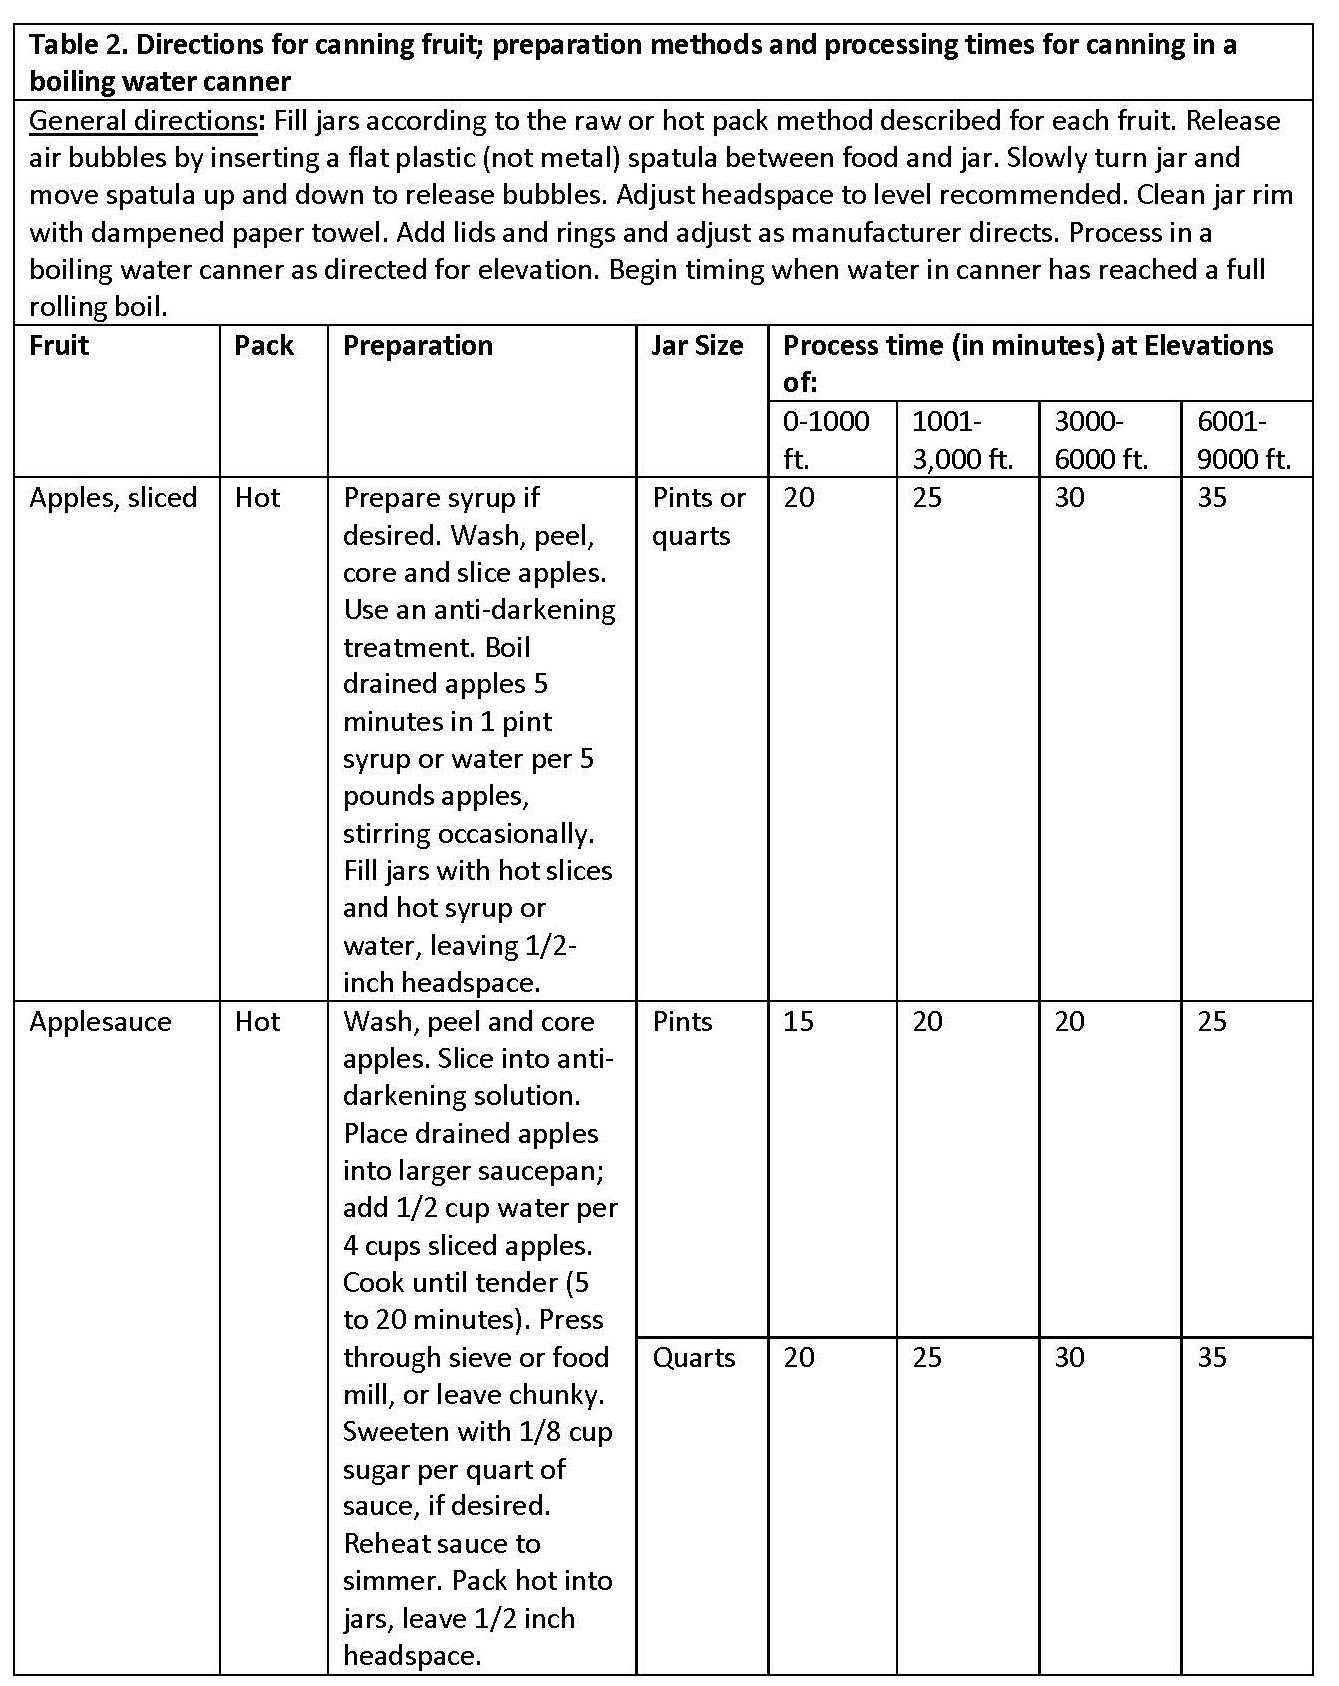
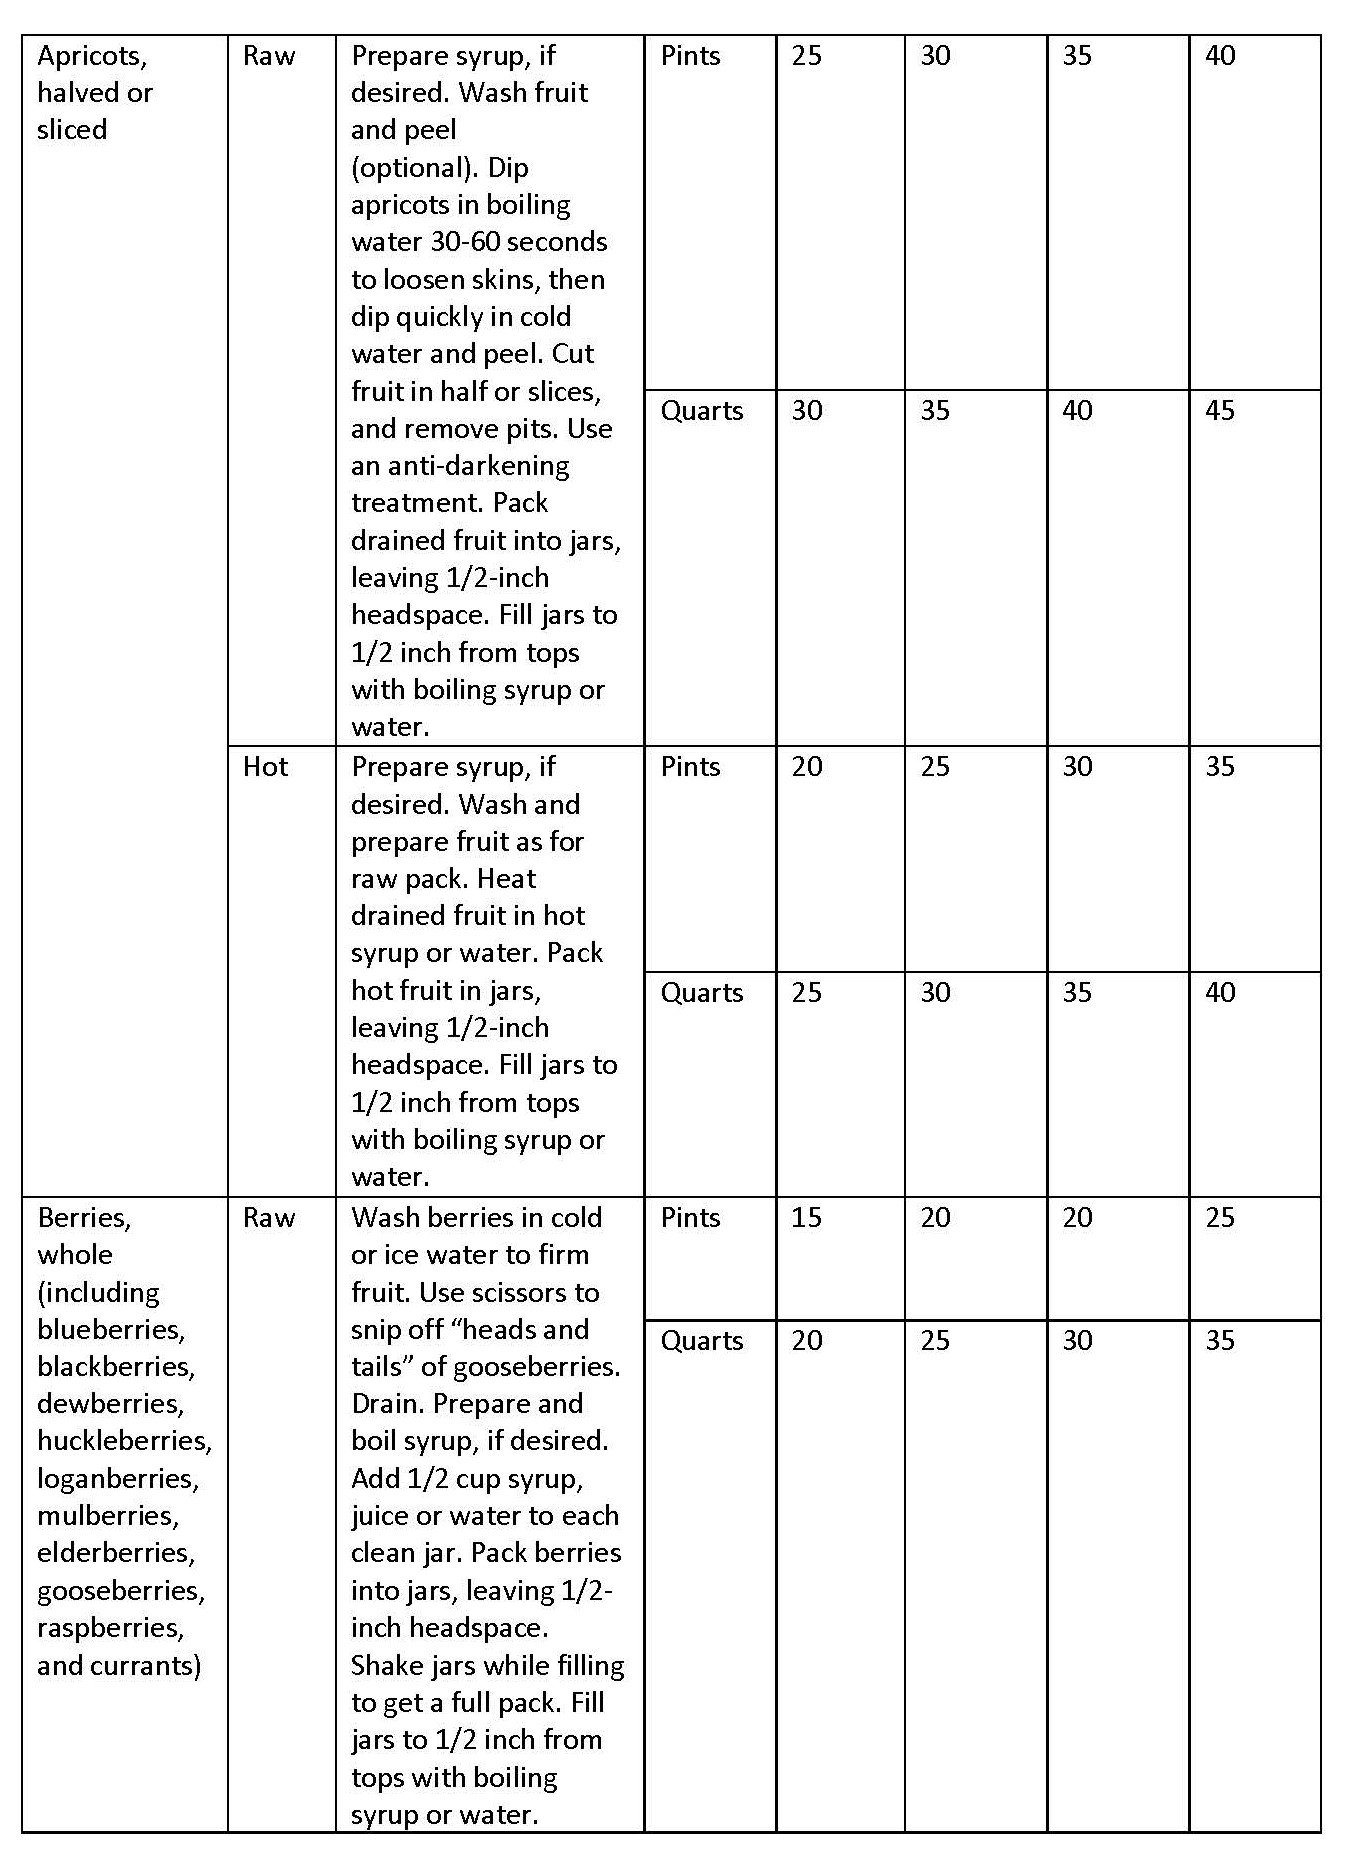
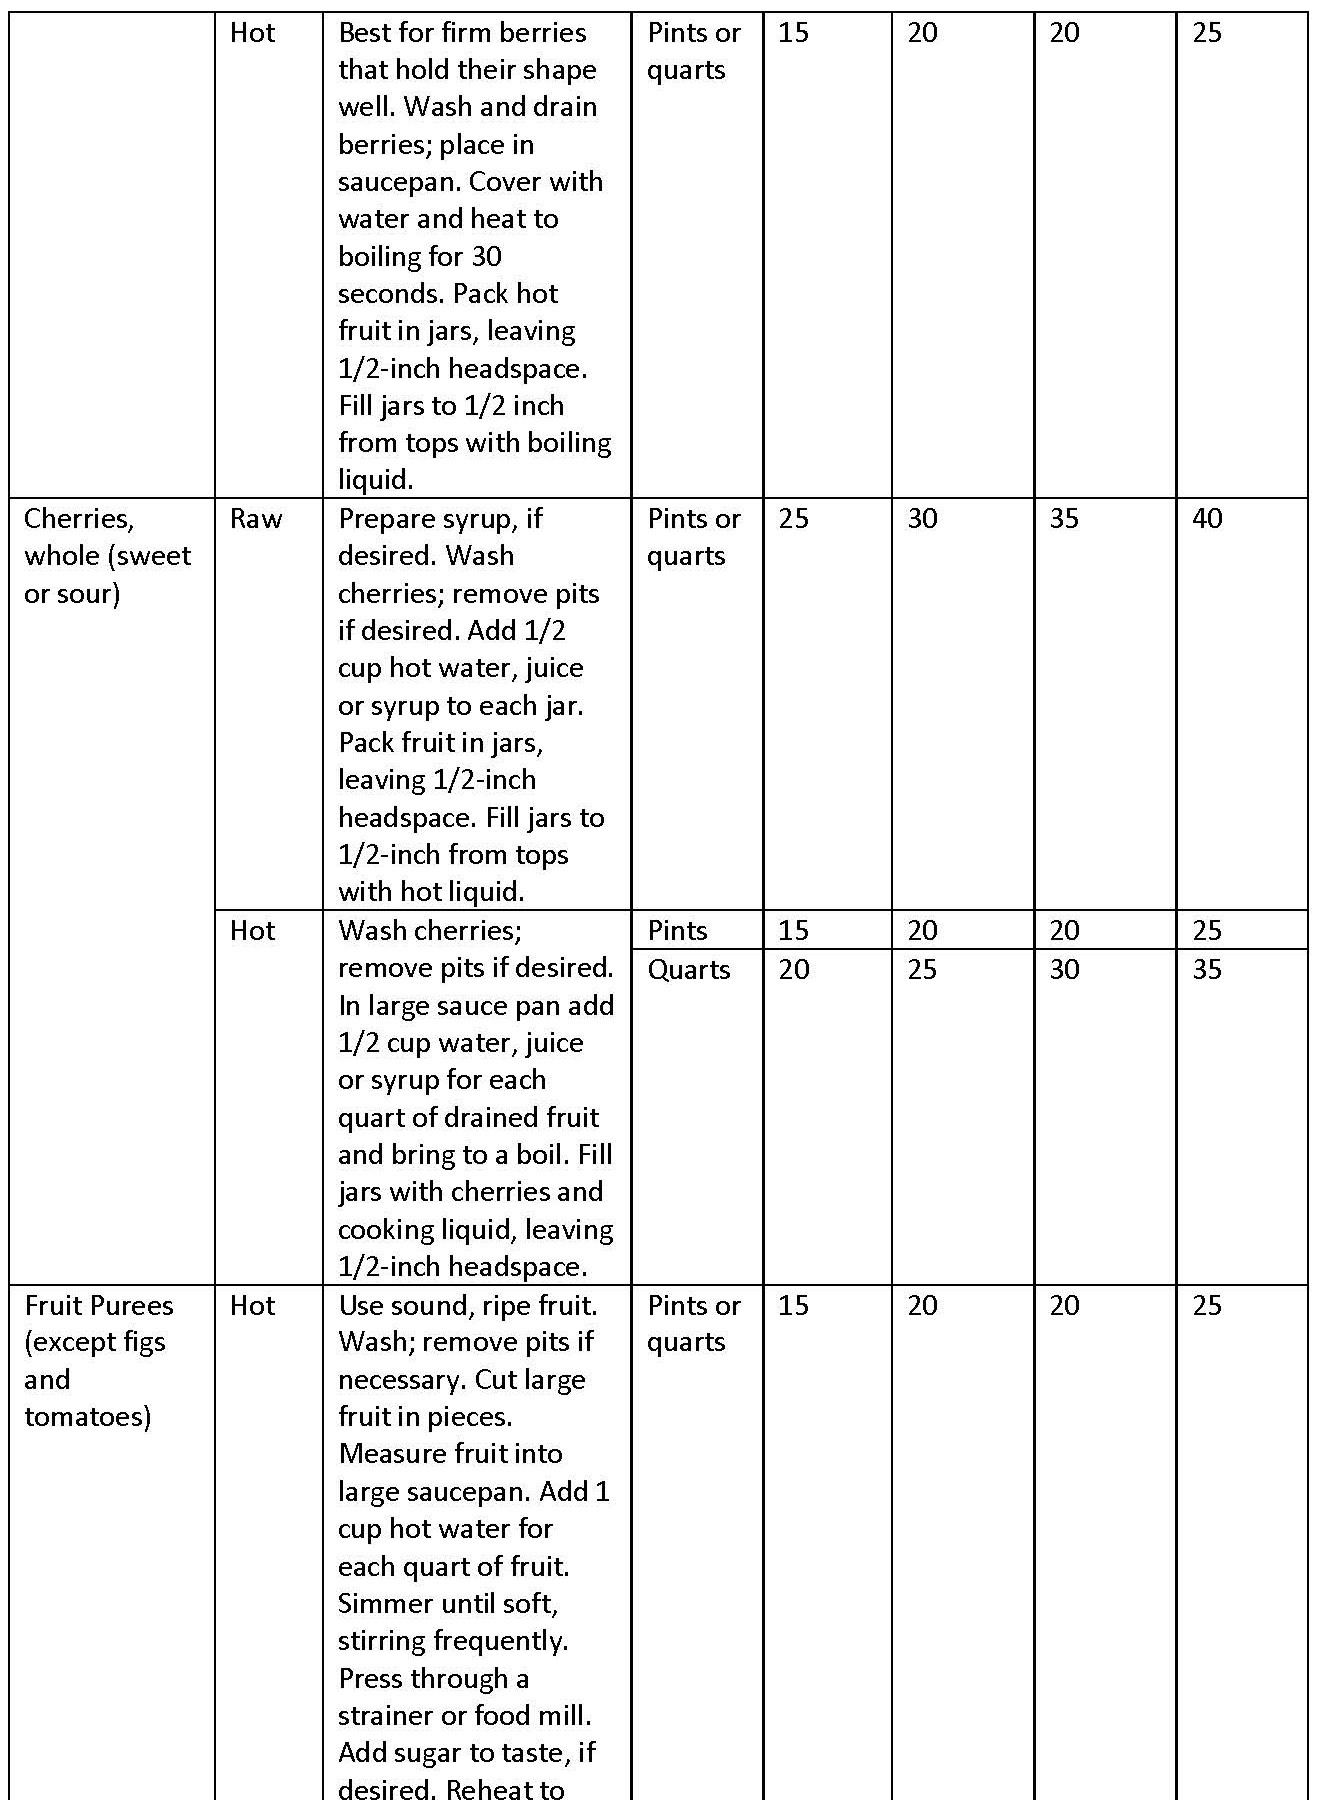
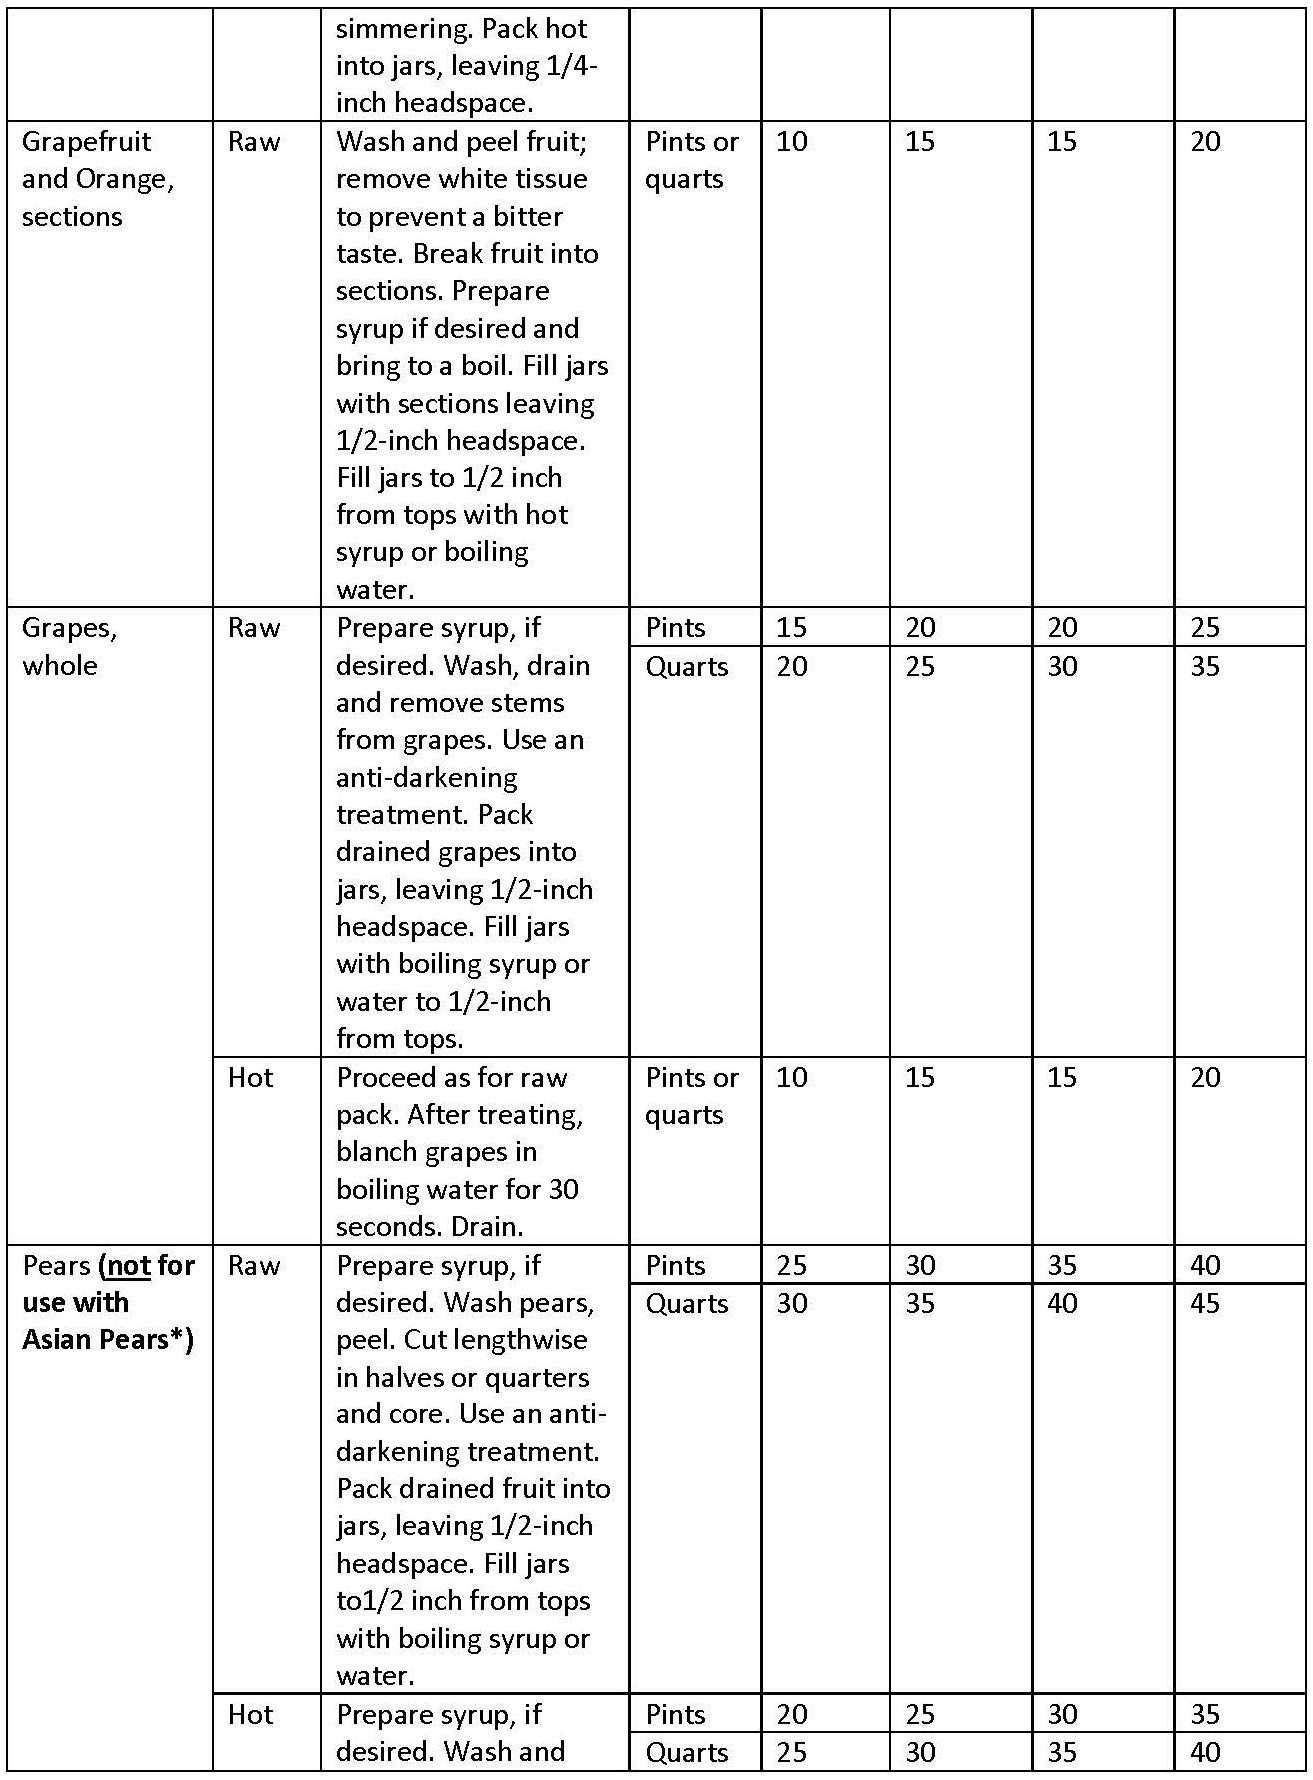
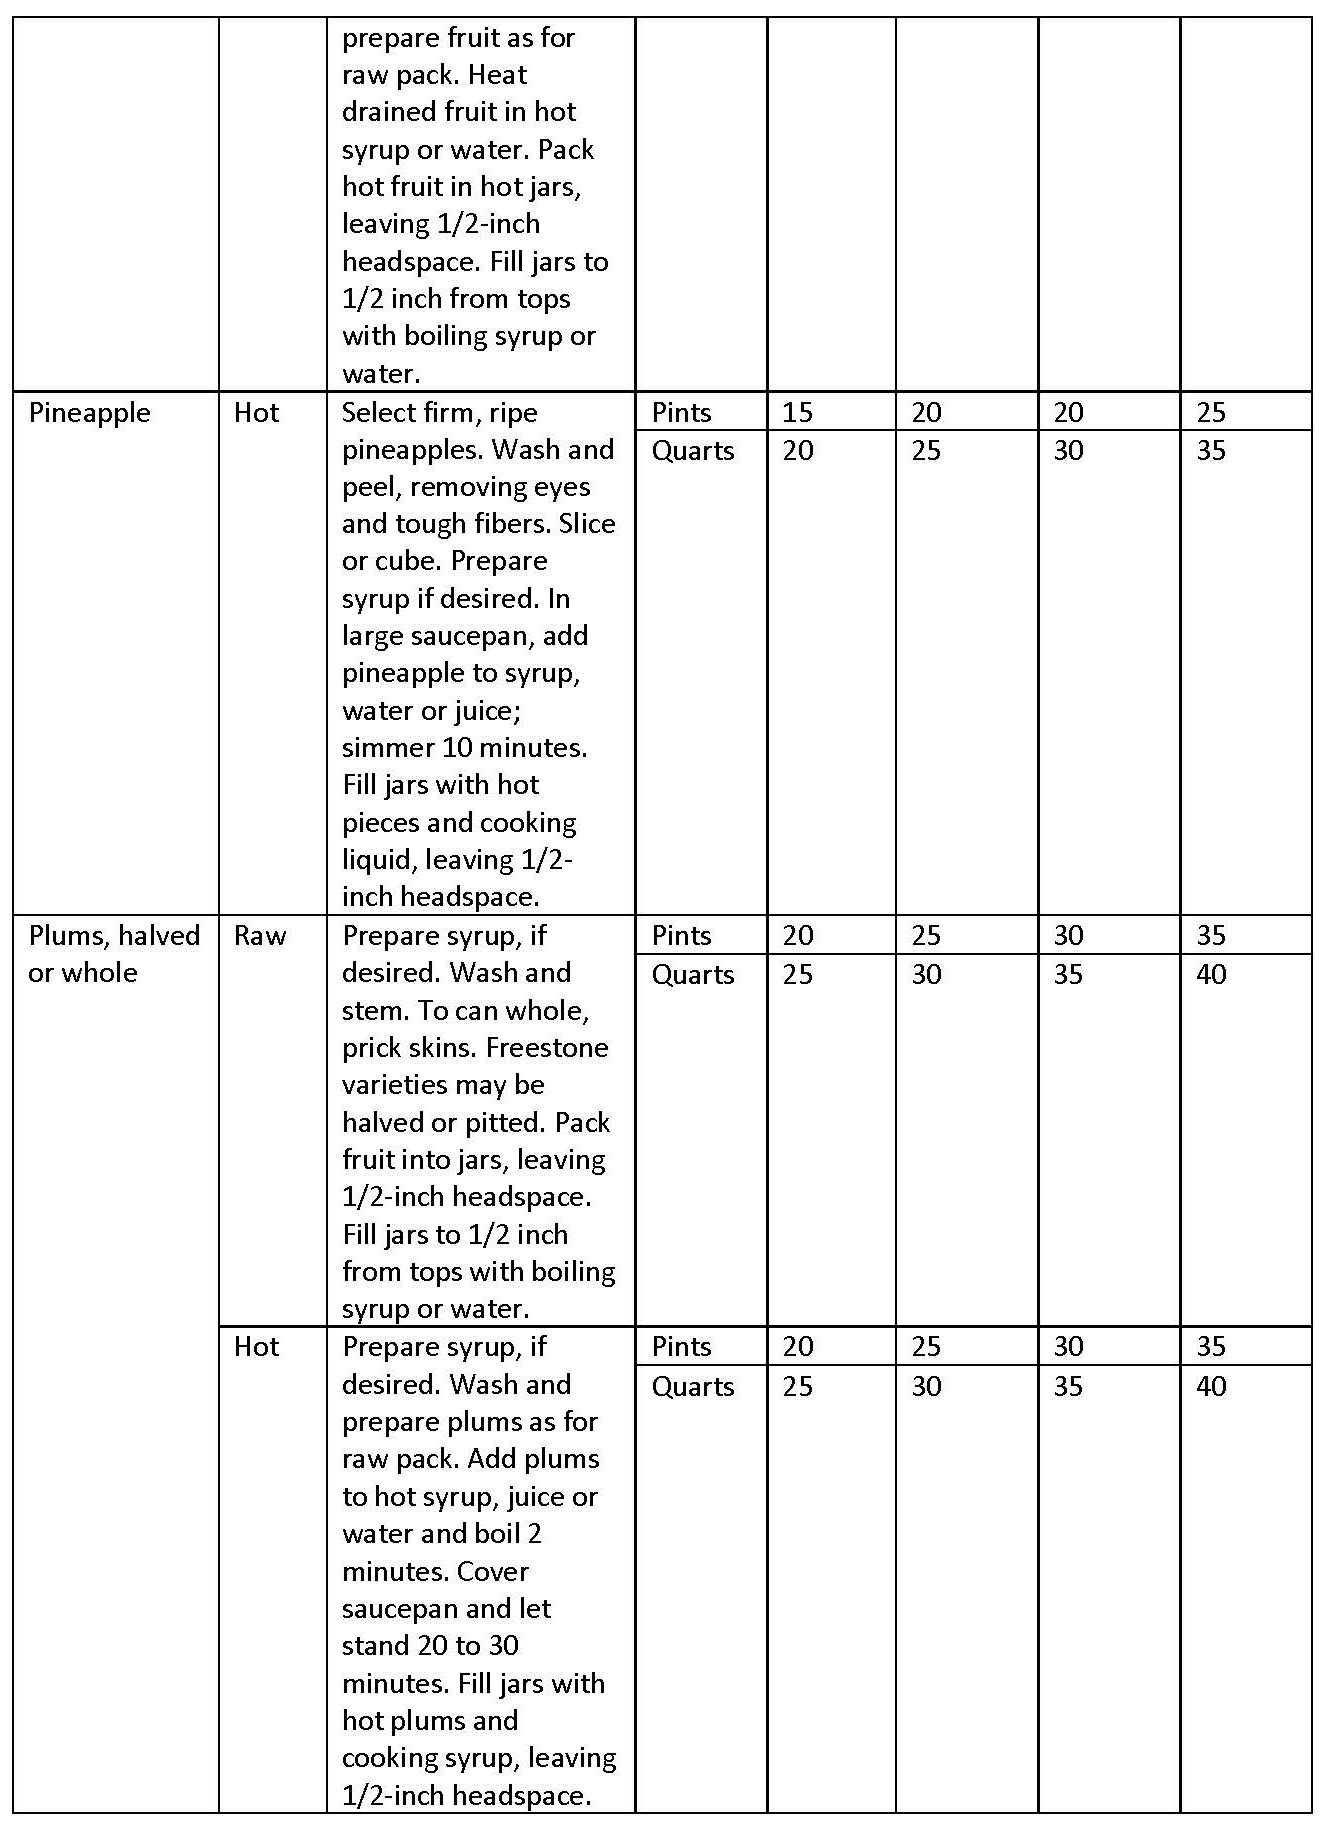
- Prepare as specified in a tested recipe (size of pieces, peeled, packing method, etc.).
See directions by fruit type in Table 2.
Anti Darkening Treatment (Optional)
Some peeled or cut fruits darken when exposed to air. Any of the following simple treatments will help prevent darkening:
- Use a commercial ascorbic acid mixture, available in grocery and hardware stores. Follow package instructions.
- Use a solution of any of the following (keep fruit in solution and drain when ready to fill jars):
- 1 teaspoon ascorbic acid (vitamin C) in 1 gallon water.
- 1 teaspoon citric acid U.S.P. grade in 1 gallon water
- 3/4 cup lemon juice in 1 gallon water
Sweeten Fruit (Optional)
Sugar helps canned fruit hold its shape, color and flavor but is not necessary to prevent spoilage. Fruits also can be packed in boiling hot water or juice. Processing instructions are the same for unsweetened and sweetened fruit. Any of the following may be used to provide sweetness:
- Sugar Syrup. Mix sugar with water or with juice extracted from some of the fruit. Heat sugar and water or juice together until the sugar dissolves; skim if necessary. Use the proportions in Table 1 depending on the sweetness of the fruit and your taste preference.
| Table 1: Sugar syrup proportions adequate for 9-pint load. | ||
| Water or juice (cups) |
Sugar (cups) |
Type syrup |
|---|---|---|
| 6 1/2 | 3/4 | very light (10% sugar) |
| 5 3/4 | 1 1/2 | light (20% sugar) |
| 5 1/4 | 2 1/4 | medium (30% sugar) |
- Extracted Juice. Thoroughly crush ripe, blemish-free, juicy fruit. Heat to simmering (185˚ F to 210˚ F) over low heat. Strain through a jelly bag or other cloth.
- Sugar mixed directly with fruit. Add 1/4 to 1/2 cup sugar to each quart of prepared fruit. Bring to a simmer over low heat. Pack hot fruit and juice.
- Sweeteners other than sugar. Light corn syrup, brown sugar, or mild-flavored honey can replace as much as half the sugar used in canning fruit. It is best not to use molasses, sorghum, or other strong-flavored syrups because their flavor can overpower the fruit flavor and also darken the fruit.
- Artificial sweeteners. Saccharin-based sweeteners can turn bitter during processing and aspartame-based sweeteners lose their sweetening power during processing. It is recommended to add these after processing, just prior to serving.
Fill Jars
- Fruits can be packed into jars raw or preheated and packed hot.
To raw pack. Place raw, prepared fruit into clean, hot canning jars and cover with boiling-hot syrup, juice or water. Pack fruits tightly into the jars because they will shrink during processing which can result in excess head space and/or fruit not being covered by liquid.
To hot pack. Heat prepared fruits in syrup, water, extracted juice or steam before packing. Juicy fruits can be preheated without added liquid and packed in the juice that cooks out. Pack hot food loosely in hot canning jars. Food should be at or near boiling temperature when it is packed. Because fruit shrinkage has already taken place and more fruit can be added to each jar, hot packing is the preferred packing method for foods processed in a boiling water canner.
Both packs. Use enough hot syrup, water or juice to fill around the solid food in the jar and to cover it completely. See Table 2 for the correct amount of headspace to leave between the top of the fruit and the top of the jar. The specified headspace is critical for creating a good seal.
- Remove any trapped air bubbles by sliding a nonmetallic spatula or bubble remover between the food and the sides of the jar. If necessary, add more liquid to obtain the proper headspace.
- Wipe jar rim with a clean, dampened paper towel to remove any food particles or liquid. Place pretreated lid on the jar, gasket side down. Screw the metal band down fingertip tight. Do not over-tighten!
Process in Boiling Water Canner
- Place filled and lidded jars on rack in boiling water canner or deep kettle that has been half-filled with hot (140˚ F) water for raw-packed foods or very hot water (170˚ F) for hot-packed foods. Use a thermometer to monitor these temperatures!
- Add boiling water as needed to bring water an inch or two over the tops of jars. Do not pour boiling water directly on glass jars.
- Turn heat on HIGH until water in the canner boils vigorously, then cover canner and set timer for the recommended elevation-adjusted time.
- Adjust heat setting to maintain a constant, gentle boil throughout timed process. Add boiling water, if needed, to keep water level above jars.
- When processing time is complete, turn off heat and carefully remove canner lid. Using a jar lifter, remove jars and place them on a rack or dry towel.
- Allow jars to cool untouched, away from drafts, for 12 to 24 hours before testing seals.
Test Seals
Test the seal on each jar by pressing the flat metal lids at their center. They should be slightly concave and not move.
NOTE: Treat unsealed jars as perishable. Eat the food immediately, refrigerate for use within a week, freeze, or reprocess by repeating the entire canning process.
- Remove screw bands. Wipe jars and lids to remove any food residue. Wash and store screw bands in a dry place.
- Label sealed jars with contents, canning method used, and date.
- Store in a cool, dry, dark place. Stored properly, canned fruits should retain their high quality for about one year.
Be on the Lookout for Spoilage!
- Look closely at jars of home canned foods when opening them. A bulging lid or leaking jar is a sign of spoilage. Also beware of spurting liquid, an “off odor,” or mold.
- Dispose of all spoiled canned food in a place where it will not be eaten by people or pets. Never taste or use a home canned food product that shows signs of spoilage!

References
So Easy To Preserve, 6th Edition, 2014. University of Georgia Cooperative Extension. National Center for Home Food Preservation website https://nchfp.uga.edu/
*M. Bunning, Colorado State University Extension food safety specialist and professor, P. Kendall, Ph.D., R.D., Colorado State University professor emeritus; and E. Shackelton, Colorado State University Extension specialist. 10/99. Revised 3/22
Colorado State University, U.S. Department of Agriculture and Colorado counties cooperating. CSU Extension programs are available to all without discrimination. No endorsement of products mentioned is intended nor is criticism implied of products not mentioned.
Go to top of this page.