by S.E. Newman 1(10/09)
Quick Facts…
- There is a direct correlation between the size of a bulb and the size of the flower grown from that bulb.
- Late September is the preferred time to plant bulbs so they root well before the ground freezes.
- The selected site should have adequate sunlight, be well drained and show the flowers off to their best advantage.
- Bulbs are planted much deeper than seed; therefore, soil preparation methods differ. Plant bulbs with the growing tip up.
- Fertilizer must be present in the root zone to be effective.
Selection
The earlier bulbs and corms are purchased in the fall, the better the selection. Select the largest bulbs of a variety, because there is a direct correlation between bulb and flower size. Avoid those that show evidence of mold or mechanical damage.
While it is preferable to select bulbs and corms individually from open bins rather than prepackaged, there is a chance that a prior customer may not have put bulbs back in the proper bins. If the adjacent bins have similar bulbs, this mix-up will go undetected.
Generally, a gardener selects the site before purchasing bulbs. This site usually is conspicuously located to show the flowers off to their best advantage. If the bulbs will remain in this
location for more than one year, they need adequate sunlight to regenerate strong bulbs. A southern exposure, especially when close to the foundation, induces early emergence that may result in freezing injury. Assure drainage so that the bulbs will not become waterlogged. Finally, a solid block of one color is more impressive from a distance than a mixture of colors and varieties.
Planting and Growing Fall Bulbs
September and October are the best months for planting bulbs. This will allow ample time for the bulbs to become well rooted before the ground freezes. Bulbs planted after October may not
have time to root adequately and therefore may not flower uniformly in the spring. Freezing and thawing during the winter may also push an un-rooted bulb out of the ground. Consider mulching the bed to maintain a more consistent soil temperature. See fact sheet 7.214 Mulches for Home Grounds.
Plant the bulbs at a depth consistent with the level indicated on the planting chart. As a general rule, this depth is four times the height of the bulb between the soil surface and the tip of the
bulb. Make sure to plant the bulbs with the growing tip up.
After the ground freezes, cover the bed with a 3-inch mulch to prevent alternate freezing and thawing that breaks roots and damages bulbs. For more information, see fact sheet 7.214, Mulches for Home Grounds. This mulch may be removed in April before the shoots emerge, or left in place if the shoots can penetrate it easily.
Remove flowers as soon as they wither. The developing seed will divert food produced by the foliage that otherwise would be used to produce more vigorous bulbs. Apply nitrogen at the rate of
1/4 pound per 100 square feet before the foliage withers. After the foliage has withered completely, the bulb is dormant. Any additional fertilizer applied after the bulb has become dormant will not be used and wasted.
Bulb beds are usually not dug up after the first year. However, after the second year, the developing bulbs may begin to crowd and lose much of their original vigor, which
will result in smaller blooms. When this occurs, dig the bulbs in late August and allow them to dry for a few days in a shady, cool spot. Divide and replant only the best ones, preferably in a new
location. If none of the bulbs are as large as the original ones, purchase new bulbs for better results. This is especially true of hyacinths, which are seldom worth transplanting.
When the bulb bed occupies a prominent place in the yard, many growers remove the bulbs after flowering, replacing them with annuals for the summer. It also is possible to interplant annuals among the withering bulb tops. However, do not remove the bulb tops until they are dead. The annuals grow faster and fill in the bed sooner if 5 pounds of 5-10-5 fertilizer per 100 square feet are worked into the soil rather than the 1/4 pound of N as suggested previously.
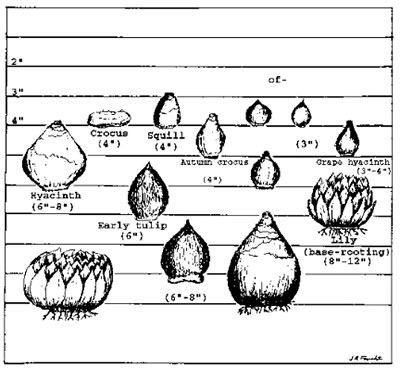 |
| Figure 1: Bulb planting chart. (Numbers in parentheses refer to minimum spacing.) Lilies normally are planted in the spring, while autumn crocuses normally are planted in midsummer. All other bulbs shown are planted in the fall. Planting depths are for well-drained soils. Bulbs do best in a sandy, clay loam. In heavier soils, plant 1 to 2 inches higher. |
Soil Preparation
- Bulbs are planted deeper than seed; therefore, soil preparation methods differ from those used elsewhere in the garden.
- According to the bulb-planting chart (Figure 1), all bulbs root below 4 inches. For fertilizer to be effective, it must be present in the vicinity of the roots.
- Excavate the bed to the bulbs’ planting depth. Apply the fertilizer and soil amendments at this level, and spade or rototill the soil to a depth of 3 or 4 inches.
Take care to not compact the soil beneath the bulbs, which will result in a hard pan with poor drainage. This will promote water logging. - Aeration is the most important aspect of soil preparation. Before the soil is shoveled back into the bed, mix it with some type of organic matter (see fact sheet 7.235 Choosing a Soil Amendment). Space the bulbs as desired, refill the bed and water to settle the soil around the bulbs.
- The flower bud and the food necessary to produce the flower are present inside a bulb when it is planted. Fertilizer is applied to make larger bulbs the following year.
- Apply phosphorus fertilizer at planting time so it is available to the roots, because it does not translocate in the soil. Adequate phosphorus may be supplied with 1/2 pound of 0-46-0
fertilizer (treble super phosphate) per 100 square feet. Note that CSU research has shown that phosphorus from bone meal is only available to plants in soils that have a pH below 7. Bone meal is
not regularly recommended for Colorado gardens. - To improve the texture of the soil, add spahgnum peat moss or well-decomposed compost using up to one-third of the volume of soil removed from the bed as described. Soil amended in this way offers
less resistance to the shoot as it emerges and provides better aeration and drainage for root growth. Soils that are high in clay should be heavily amended.(See fact sheet 7.235 Choosing a Soil Amendment.)
1S.E. Newman, Colorado State University Extension greenhouse crops specialist and professor of floriculture, horticulture and landscape architecture. Original publication by J.E. Ells, Colorado State University Extenison vegetable crop specialist
and associate professor; and J. R. Feucht, Extension landscape plants specialist and professor. 6/97. Reviewed 10/09.
Go to top of this page.