by C. Weiner* (7/19)
Quick Facts…
- Uncomfortable drafts and high energy bills are often the result of a home with gaps and cracks between living spaces and the outdoors or unconditioned spaces. Air sealing is an important step in making one’s home more energy efficient and comfortable.
- A blower door test by a professional energy auditor is recommended before significant air sealing to know if the home needs mechanical ventilation or is too leaky. The audit itself is also the best way to detect specific air leaks, but a basic pressurization test or thermal leak detector can also be used to locate leaks.
- Many air sealing measures can be done by homeowners and renters themselves, and the U.S. DOE provides guidance on selecting specific caulking and weather stripping products.
- It is not uncommon for small air leaks to add up to a window size opening in the home, open 24/7 throughout the year.
Sealing air leaks while allowing for adequate ventilation is an important first step to having an energy-efficient, healthy home. Uncomfortable drafts and high energy bills are often the result of a home with significant gaps and cracks between the living spaces and the outdoors or unconditioned spaces. According to U.S. Department of Energy (U.S. DOE) studies, air sealing can often achieve home energy savings of 10% to 20% and even more in older, leaky homes. In addition, air leakage is a leading cause of moisture damage in otherwise well-insulated homes. This fact sheet is designed to assist Colorado residents with home assessment, air leak
identification, and sealing.
Goal of Air Sealing
The goal of sealing cracks and gaps is to prevent unwanted air from flowing both into and out of the home. For example, a gap between a door and the door frame could let heat escape from the home in winter and heat enter the home in summer. Furnaces or air conditioners have to work harder to make up for lost heat (winter) or unwanted heat (summer).
When gaps in the building shell are located close to where a lot of time is spent (i.e. a favorite couch or chair in the living room), the heat loss or gain may also feel uncomfortable. Cracks and gaps in the tops and bottoms of homes are also significant sources of energy loss because as hot air naturally rises it escapes through gaps in ceilings. When this occurs, cold air will be pulled in through gaps in our floors, making us even colder in winter (the ‘stack effect’).
The ultimate goal of air sealing is to reduce both physical discomfort and energy use. Air sealing is also an important step to take before adding insulation to a home. Most types of insulation (aside from foam and very densely blown-in loose fill insulation) will still let air pass through them. In addition, once insulation is added it is more difficult to uncover and plug air leaks hidden underneath the insulation.
Approaches to Air Sealing
There are two main approaches to air sealing. The first is to seal highly visible and significant air leaks as resources allow. This “opportunistic approach” makes sense to many households and can be effective in chipping away at discomfort and energy costs. One downside of this approach is that it won’t maximize comfort or energy savings. In some cases it can also lead to unintended consequences around moisture, radon, particulates, carbon monoxide, and more. Of particular note is that air sealing around combustion appliances can mean that those appliances (such as natural gas furnaces or water heaters) do not get enough fresh air intake to complete combustion. Incomplete combustion can produce carbon monoxide, a potentially deadly, invisible, and odorless gas.
The second, more holistic, approach is to seal the home as tightly as possible and then to ventilate it to recommended levels using a mechanical ventilation system. In Colorado, both heat recovery ventilators (HRVs) and energy recovery ventilators (ERVs) are designed for this purpose. As shown in Figure 1, in cold months HRVs preheat incoming cold, fresh outdoor air as they exhaust stale indoor air. An HRV can also pre-cool incoming fresh air in the summer months. ERVs work similarly but also provide for exchange of moisture with the outdoors.
For homes being retrofitted with this technology, HRVs/ERVs are typically installed into existing forced air ductwork. A small fan in the HRV/ERV will push the supply air through the machine and ducts into the conditioned spaces of the home. This type of heat exchange provides ventilation while keeping energy use low. Ductwork can be added to homes that don’t have it in order to accommodate an HRV/ERV, but the cost may be prohibitive. A ‘spot’ ERV is an alternative when a certain room in a home could benefit from controlled air exchange, such as a kitchen or bathroom.
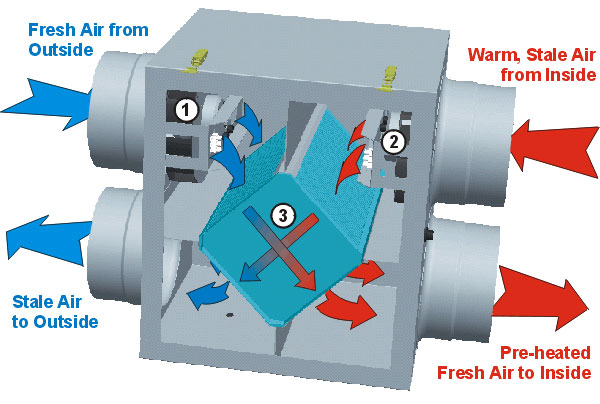 |
| Figure 1: A heat recovery ventilator (Source: https://www.prostarmechanical.com/) |
One advantage of this approach is that HRVs/ERVs will supply sufficient fresh air to the home regardless of weather conditions. Another benefit is that fresh supply air will enter the home from only one controlled point instead of from various random holes in the home’s shell. If located properly, this allows the occupants to expect good indoor air quality at all times throughout the year.
Identifying Air Leaks
Air leaks can be found in a number of places throughout the home. Many homeowners may be familiar with caulking and weather stripping around windows and doors in order to prevent air leaks. Table 1 illustrates, however, that windows and doors are only portions of the air infiltration story for average homes in the U.S.
Because each home has been built differently, it is important to investigate your own home thoroughly. A professional energy audit is the most reliable way to identify the often hidden locations of air leaks. During an auditor’s blower door test, parts of the home with high rates of air exchange can be identified. Similarly, leaks in a home’s ductwork can be identified using a duct blaster, although this is a more time intensive and potentially costly process. An infrared scan of the home can also reveal cold/hot spots that may be susceptible to air leaks and is particularly effective when conducted at the same time as the blower door test.
| Table 1. Total air leaks in average home. |
| Floors, walls, and ceilings/attics = 31% combined |
| Plumbing, electrical, and HVAC penetrations = 17% |
| Ducts = 15% |
| Fireplaces = 14% |
| Doors = 11% |
| Windows = 10% |
| Electrical outlets = 2% |
For do-it-yourselfers, there are other techniques that can reveal the presence of air leaks in certain locations. Some leaks can be detected by holding a damp hand in front of the area to be tested (such as a door or electric outlet) on a windy day. Another method is to:
- On a windy day, turn off all combustion appliances such as furnaces and water heaters.
- Close all windows, exterior doors, and fireplace flues.
- Turn on all exhaust fans such as bathroom and kitchen fans.
- Hold a lit incense stick in front of the areas described in Table 1 to see if moving air makes the smoke blow.
More recently, inexpensive thermal leak detectors have become available on the market that can be pointed at test areas to reveal temperature differences from a set reference temperature.
Doing it Yourself
You can do many of the air sealing measures referred to in Table 2 yourself, especially caulking, applying spray foam from a can, and weather stripping. While the actual applications are fairly straightforward and should follow manufacturer’s guidelines, many different choices exist for these products. For caulking and weather stripping, the U.S. Department of Energy offers excellent descriptions of the different choices available.
Again, extreme caution must be used in order to avoid sealing areas that may be bringing fresh air intake to combustion appliances. If in doubt, don’t seal and contact a BPI-certified technician to perform a ‘combustion appliance zone’ (CAZ) test to help determine the appropriateness of air sealing actions.
For spray foam from a pressurized can, select from various ‘closed cell’ foams. Closed cell foam is usually a polyurethane-based foam that protects against moisture as well as air infiltration and also insulates. Many of these foams will expand to a significant degree, so if sealing a gap around a space sensitive to expansion (such as a window frame), look for a foam with no or limited expansion. Once applied, these foams are typically quite firm and dense, but they can be trimmed for aesthetic purposes. Spray foam should be chosen over caulk when trying to fill gaps of ¼ inch or more.
Plugging Air Leaks
Table 1 illustrates that air leaks can be found throughout many different parts of a home. It is not uncommon for small air leaks to add up to a window size opening in the home, open 24/7 throughout the year.
Table 2 identifies areas of homes where air leaks are commonly found and suggests solutions to those leaks.
Table 2. Problem areas and solutions for air leaks.
| Floors: | |
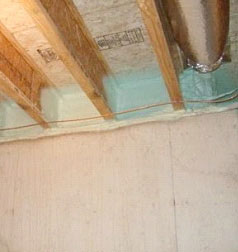 Figure 2. Spray foam seals leaks between floor joists and the foundation. |
Air leaks in floors are commonly found at the 90 degree angles where framing members meet, especially when floors extend beyond exterior wals or the home’s foundation (cantilevers). Caulk, spray foam, or water-based elastomeric sealant can be used to seal gaps between floor joists and walls or floor joists and the home’s foundation when finishing a basement, replacing flooring, or whenever the gaps are accessible.
(Photo source: U.S. DOE: Building America Best Practices – Air Sealing, 2010) |
| Walls: | |
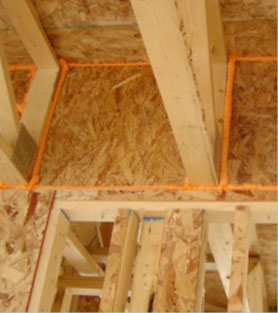 Figure 3. Joists running through a common wall of a garage can be sealed with caulk, spray foam, or water-based elastomeric sealant if exposed. |
All gaps in the common wall between the garage and home should be sealed completely using caulk, foam, water-based elastomeric sealant, or other material. This is especially important considering that carbon monoxide can migrate from car-occupied garages and hazardous pollutants stored in garages without cars can migrate into living spaces. Preliminary results from a small study in Canada revealed that 13% of all air infiltration in homes occurred at the common wall between the garage and house. Penetrations in walls from plumbing, electrical, and HVAC are covered under a separate heading.
(Photo source: U.S. DOE: Building America Best Practices – Air Sealing, 2010) |
| Ceilings: | |
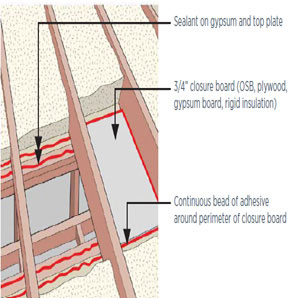 Figure 4. Air sealing a dropped ceiling |
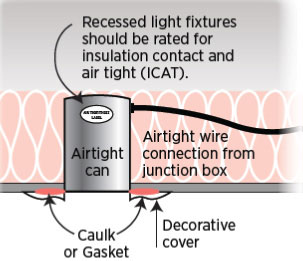 Figure 5. Replacing non-ICAT rated recessed can lights with ICAT rated cans is one way to reduce the air infiltration associated with cans. |
Visible cracks at the seam of walls and ceilings can be filled with a paintable caulk. Attic access hatches can be sealed by weather stripping the hatch perimeter and closing it using a tight latch. Dirty attic insulation is an indication of air leakage through the ceiling. Temporarily pulling back or shifting attic insulation can reveal areas of air infiltration between the attic and ceiling. Dropped ceilings can be sealed by adhering rigid foam board or similar to the top plate of the ceiling. Recessed can lights can also be major sources of air leaks in ceilings. If these cans are not rated for insulation contact and air tightness (ICAT), they can: 1) be replaced with cans that are; or 2) tightly sealed boxes can be built around them by industry professionals. Replace incandescent light bulbs in ceiling cans with LED bulbs in order to reduce the movement of hot air through the cans.
(Photo source: U.S. DOE: Building America Best Practices – Air Sealing, 2010) |
|
| Plumbing, electrical, and HVAC penetrations: | ||
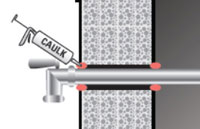 Figure 6. Caulk or spray foam can be applied on the inside and outside of the home as necessary. |
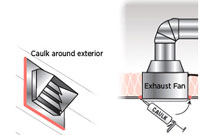 Figure 7. Caulk or spray foam can be applied on the inside and outside of the home as necessary. |
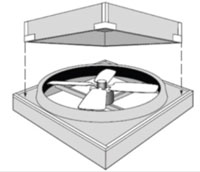 Figure 8. Whole house fan covers should be removed before operation in warm months and replaced after operation ceases in cold months. |
Plumbing, electrical, and HVAC penetrations should be sealed with caulk or spray foam. Wherever such penetrations go through exterior walls, caulk or foam should be applied on both the interior and exterior of the home. Fireplace, furnace, and water heater flue penetrations in attics can be sealed by professionals using sheet metal and high temperature caulk.For whole house fans, standard louvers do not seal or insulate tightly. Therefore, fan covers can be constructed or purchased to reduce air infiltration in these otherwise large holes in attics. If purchasing a whole house fan, look for a unit with specialized louvers that are intended to air seal and insulate.
(Photo source: U.S. DOE: Building America Best Practices – Air Sealing, 2010) |
||
| Ducts: | |
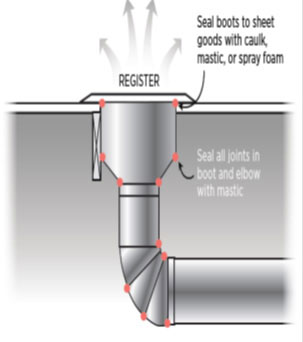 Figure 9. Mastic should be used to seal ductwork wherever connections between two components are made. |
Up to 30% of energy produced by heating and cooling systems can be lost through leaky, poorly insulated ducts. All joints and seams should be sealed with duct mastic and taped over with a foil tape – cloth duct tape dries out and falls off easily. This is especially important if ducts run through unconditioned spaces that are vulnerable to hot and cold temperature extremes. In situations where wall and floor joist cavities are used as return ducts (typically older homes), these cavities should be sealed properly.
(Photo source: U.S. DOE: Building America Best Practices – Air Sealing, 2010) |
| Fireplaces: | |
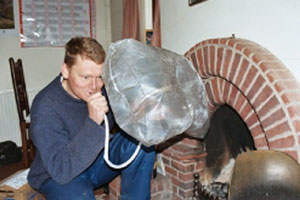 Figure 10. Use of a chimney balloon is a simple way to reduce air infiltration from a fireplace. |
Even closed fireplace dampers can leak air as they become warped from heat over a prolonged period of time. Air infiltration from fireplaces can be reduced through the insertion of a blown-up chimney balloon into the fireplace.
(Photo source: bbc.co.uk) |
| Doors: | ||
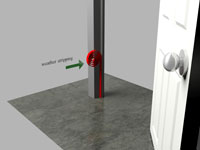 Figure 11. For the knob side of the door and above the door, weather stripping should be adhered to the narrow leading edge of the door frame. |
 Figure 12. For the knob side of the door and above the door, weather stripping should be adhered to the narrow leading edge of the door frame. |
 Figure 13. For the hinge side of the door, it should be adhered to the wide trim to which the hinges themselves are attached. |
Professionally removing the interior trim (frame) of doors and applying non-expanding foam or backer rod and caulk is the most effective way to fully seal around doors. A simpler and still effective alternative is to apply a clear or paintable caulk around the entire door frame exterior. Weather stripping should also be installed and/or replaced as necessary around the entire door frame interior. A door sweep attached to the bottom of a door and a properly fitted threshold attached to the bottom of the door frame can also reduce air infiltration.
(Illustrations by Robert Work.) |
||
| Windows: | |
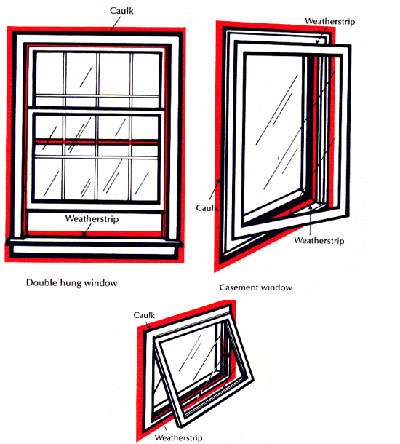 Figure 14. Highlighted areas show where caulk and weather stripping should be applied around windows. |
Professionally removing the interior trim (frame) of windows and applying non-expanding foam or backer rod and caulk is the most effective way to fully seal around windows. A simpler and still effective alternative is to apply a clear or paintable caulk around the entire window frame exterior. Weather stripping should also be installed and/or replaced as necessary around the entire window frame interior.
Photo source: Bonneville Power Administration. |
| Electric outlets: | |
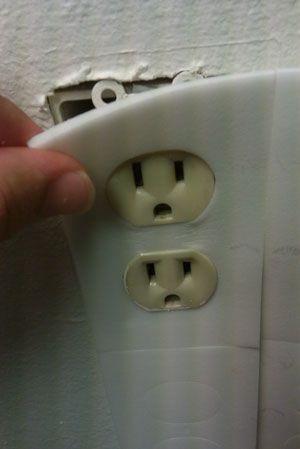 Figure 15. Foam gaskets are an easy fix to air infiltration from electrical outlets on exterior walls. |
Electrical outlets and switch plates on exterior walls can be sealed by removing the outer plate, inserting a foam gasket, reinserting the plate, and inserting nylon outlet plugs into the outlets. |
Summary
Air sealing is an important step in making one’s home more energy efficient and comfortable. A blower door test by a professional energy auditor is recommended before significant air sealing to know if your home needs mechanical ventilation or is too leaky. The audit itself is also the best way to detect specific air leaks, but a basic pressurization test or thermal leak detector can also be used to locate leaks. Many air sealing measures can be done by homeowners and renters themselves, and the U.S. DOE provides guidance on selecting specific caulking and weather stripping products. To maximize energy conservation by sealing a home completely, installation of a heat or energy recovery ventilator is suggested. Whenever air sealing measures are taken, homeowners should follow them up with a CAZ test to ensure combustion safety.
*C. Weiner, Colorado State University, clean energy Extension specialist. (7/19)
Colorado State University, U.S. Department of Agriculture and Colorado counties cooperating. CSU Extension programs are available to all without discrimination. No endorsement of products mentioned is intended nor is criticism implied of products not mentioned.
Go to top of this page.


