Susan Perry
Colorado State University Extension Master Gardener in Larimer County
April 11, 2015
For years, I’ve grown tomatoes. I would go to the nursery in late May, buy my plants, harden them off, and plant them each year on Memorial Day. A few years ago, I thought I’d try something new, so I started my tomato plants from seed. Since that worked pretty well, I’m going to try something new this year: grafting tomatoes—just a few as an experiment.
Go to your local nursery and you’ll probably be able to buy grafted tomatoes. With the possibility of hail ever-looming on our summer horizon, paying $13 or more for grafted tomato plants seems risky. So, ever the do-it-yourselfer, I decided that this year I’m going to try to graft a few of my own.
Grafting tomatoes is like grafting many other plants: basically you join “rootstock” (bottom half with roots) to “scion” (top half of plant, which will bear fruit) to get your grafted plant. The rootstock determines all the characteristics of the plant (hardiness, disease-resistance, vigor, etc.) except one – what kind of fruit the plant bears. So for tomatoes, one can select from several available rootstocks known for disease resistance and then graft a scion of Brandywine or Cherokee Purple (for example) to the rootstock.
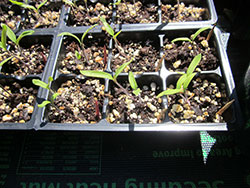
I was given half a packet of rootstock seeds. This was lucky because rootstock seeds can cost $0.50/seed—making a packet of 50 seeds cost about $25. Yikes! I’ve planted my rootstock and scion seeds, they’ve germinated, and now I’m waiting for them to get large enough to graft. Large enough will be when the plants have two to four leaves and stems are about 1/16” in diameter. I will plant them into larger containers prior to grafting.
While I’m waiting, I’ll get my healing chamber ready. Immediately upon completing the graft, I have to put the plants in a chamber (I’ll use a Styrofoam box) where I can keep the humidity at 80 to 95% by using a tray of water in the bottom of the box and keep the temperature between 70 to 80 degrees. I think keeping the box inside the house will work. For the first four days, I’ll cover the Styrofoam box with a blanket so no light can enter. Keeping the grafted plants in a warm, dark, humid environment helps healing by reducing stress as the tissue of the scion and rootstock knit together. Then, I’ll remove the blanket and over the next week, gradually reduce humidity and very gradually introduce light (Styrofoam allows light to penetrate) until I’m at full direct daylight. Since both light and low humidity can cause stress, it is best to do this most carefully. Hopefully by this time, a graft union will have formed.
The grafting process should be done in as sterile an environment as possible. Wash your hands, your razor blade, and your work surface. Use latex gloves and work indoors in an area with no direct sun. Ideally, the diameter of the stems of the rootstock and the scion will be the same, since the goal is to put two “like” pieces together with no excess exposed tissue. Cut the top of the rootstock and the scion off using a razor blade, making a 45 degree angle cut. This angle maximizes the surface area of the grafted tissue. The cuts on both the rootstock and the scion should be made above the cotyledon, or initial germination leaves (the set of leaves closest to the soil). The rootstock and scion should be attached with a silicon clip, available online.
Once you’ve completed the graft, immediately put the plant into the healing chamber, insuring that the tissue of the rootstock and scion remain in complete contact. Do not mist the plant, as this can cause separation of the scion from the rootstock. Open the healing chamber briefly twice a day to replenish carbon dioxide and add any water into the tray in the bottom of the chamber carefully. Otherwise, keep the healing chamber in total darkness and high humidity for four days, to reduce stress to the scion. At the end of four days, the unsuccessful grafts will be apparent – the scion will be wilted or dead. As mentioned above, a gradual introduction of indirect then direct light and reduction of excess humidity are recommended for successful grafts. As the grafted stem expands, the clip will eventually fall off. Carefully monitor until it is time to plant outside. There will likely be a two week delay in maturity simply due to the grafting process. When you do plant outside, be sure to keep the graft union above soil level. Monitor the plant, stake it, and remove all suckers to insure best success. I’ll let you know how my experiment turns out!
Photo by author Susan Perry.
The author has received training through Colorado State University Extension’s Master Gardener program and is a Master Gardener volunteer for Larimer County.
——————-
Larimer County is a county-based outreach of Colorado State University Extension providing information you can trust to deal with current issues in agriculture, horticulture, nutrition and food safety, 4-H, small acreage, money management and parenting. For more information about CSU Extension in Larimer County, call (970) 498-6000 or visit www.larimer.org/ext
——————-
Looking for additional gardening information? Check out the CSU Extension Horticulture Agent blog at www.csuhort.blogspot.com for timely updates about gardening around the state.
——————-
Visit PlantTalk Colorado ™ for fast answers to your gardening questions! www.planttalk.org PlantTalk is a cooperation between Colorado State University Extension, GreenCo and Denver Botanic Gardens.